Sepasoft MES Module Suite

Description
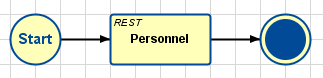
The RESTful Action Block provides a data 'consumer' connection to RESTful 'provider' web resources.
Connections
Two connections are required:
Input — (input) Receives execution control from the previous Block in the sequence. Unlimited input connections are allowed (spread across up to three available edges).
Output — (output) Passes execution control to the next Block in the sequence.
Properties
The optional Name and Description fields are included on most Blocks for clarity and documentation benefit. Note: The text in the Name field will also appear on the Block's icon on the Design Grid.
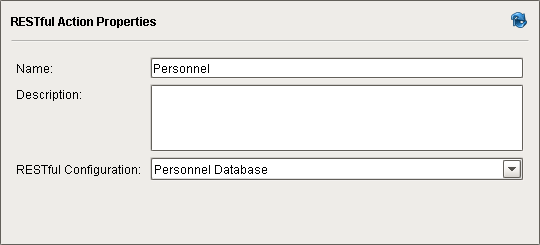
The Properties pane is used to select the RESTful Configuration previously created (a RESTful consumer, configured in the Web Services, which connects to a RESTful provider site). It also has optional Name and Description fields for clarity and documentation benefit.
Naming Characters Allowed

|
Names must begin with a letter, digit or underscore. Subsequent characters may also include spaces, dashes, underscores and parentheses. All other special characters, such as period, comma, colon, semicolon, all slashes, brackets and braces, as well as the special characters on the 1-8 keys, are not allowed. |
Mapping Parameters
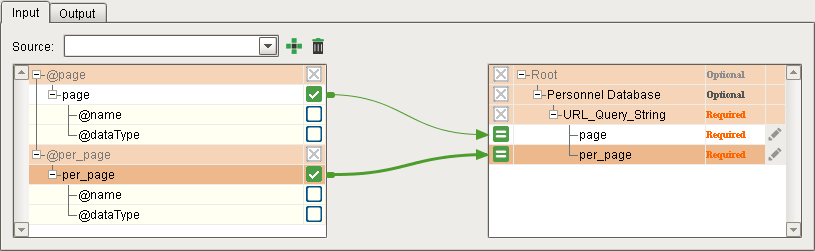
All Chart Parameters (defined in the Start Block) are available for mapping in the Input tab.
In this example, Chart Parameter values are mapped such that they will be passed as a URL query string suffix to the RESTful provider site (e.g. https://reqres.in/api/users?page=2&per_page=5).
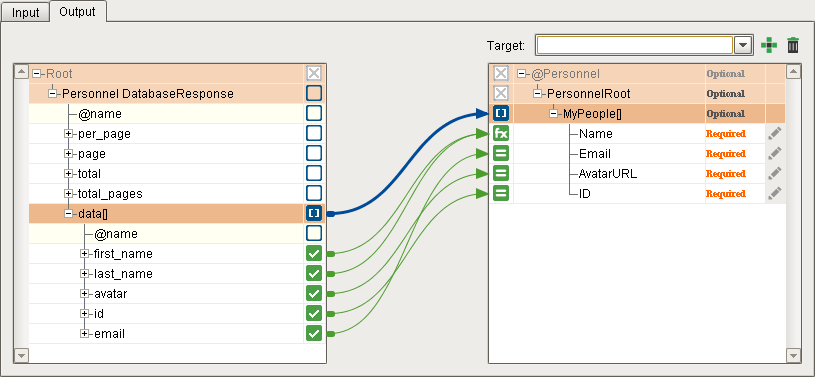
All Chart Parameters (defined in the Start Block), as well as the defined parameters from the selected RESTful consumer are available for mapping in the Output tab.
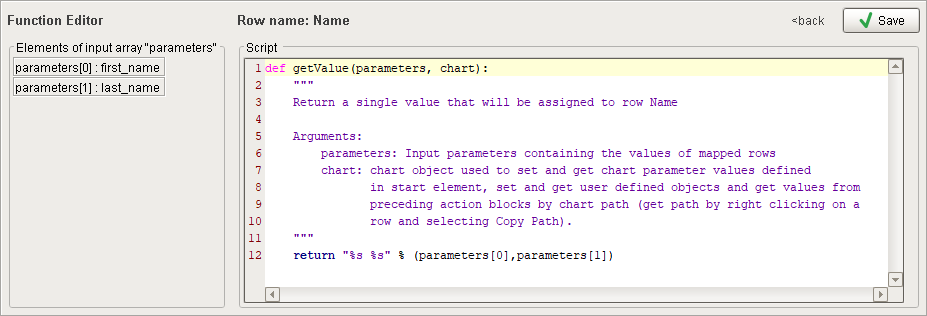
In this example, the query response from the RESTful provider site will be mapped to a Chart Parameter for return via the chart execution function (e.g. in a Button that triggered the query). Note that a script is used to string together first_name and last_name into Name.
Schema Refreshing and Changes
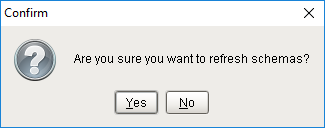
Clicking the Refresh (  ) button will cause a re-fetch of both the input and output schemas. If both schemas still match what is currently selected for each in the Block, then a "Confirm" dialog box will appear.
- Clicking Yes will cause the Block to fetch fresh data.
- Clicking No will abort the refresh.
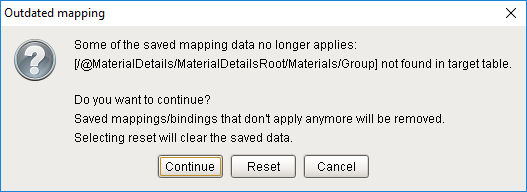
If either schema has been edited, an "Outdated Mapping" dialog box will immediately appear (without the need to press Refresh), with two choices on how to handle the schema mismatch, plus Cancel.
- Clicking Continue will apply all the mappings that are still valid and clean up the outdated mappings.
- Clicking Reset will clear all the saved data and mapping connections and then fetch a fresh copy of both schemas.
- Clicking Cancel will abort the refresh, allowing the user to manually fix the schema without losing saved data.
Usage
Connecting the RESTful Action Block
- Drag a RESTful Action Block onto the Design Grid (position to be the next block in the chart sequence).
- Click on the previous Block in the sequence and draw a Connector to the RESTful Action Block (any available edge). This becomes the Input connection. Repeat for any additional input Blocks, if applicable (unlimited connections are allowed on up to three edges).
- Click on the RESTful Action Block and draw a Connector (from any available edge) to the next Block in the sequence. This becomes the Output connection.
Selecting a RESTful Configuration
- Select one of your RESTful Consumer configurations from the RESTful Configuration drop-down list (must already exist in order to appear in the list). See Old --- RESTful Configuration for instructions on creating a RESTful Consumer.

Mapping Chart Parameters and RESTful Parameters
- In the Input tab, add (
 ) a Chart Parameter and map to a URL Query String (defined in the RESTful consumer selected in RESTful Configuration). Repeat for any other mapping connections required.
 - In the Output tab, add ( ) a Chart Parameter or an MES B2MML category (OperationsSchedule, OperationsDefinition, ProcessSegment or Material) from the Target drop-down on the right-hand side. Map over properties from the returned RESTful query. Repeat for any other mapping connections required.
Example
Import Personnel List
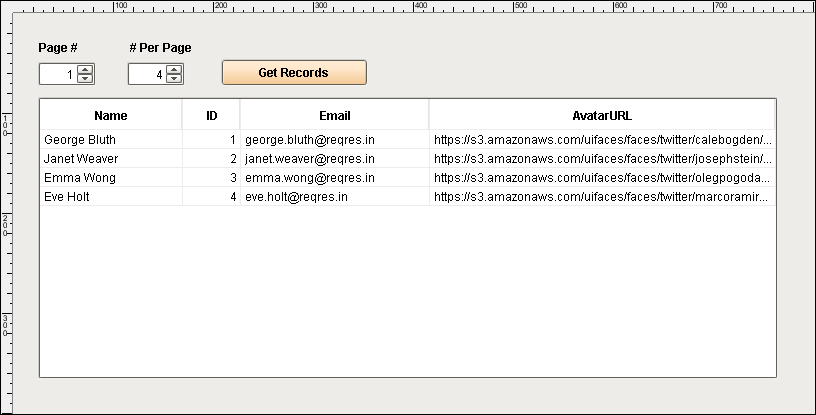
This example chart collects a list of personnel records from a RESTful provider site and displays the records on a Power Table. Two Chart Parameters (page and per_page, grabbed from from Ignition Spinner components) are passed in a URL query string, to modify which records are returned by the site. The Get Records button reads the Spinner components, executes the Business Connector chart function, cleans the returned data and then pushes the list of 'cleaned' records to the Ignition Power Table component as an Ignition Dataset.
User-Interface Window
This window provides Spinner components for user input of the page and per_page values, a Get Records button to execute the chart, and a Power Table to display the returned personnel records.
RESTful Consumer
See Old --- RESTful Configuration for instructions on creating a RESTful Consumer.
Creating the Request Schema
A RESTful consumer is required, to interact with the RESTful provider. The Request Structure is defined in the Request Message section of the RESTful Configuration screen and is composed of:
- Header variables, URL (resource path and query string)
- Body (JSON or XML).
The Request Message section plays two roles:
- Defining Request structure
- Initializing any defined variables.
Mapping into the Request Schema in the mapping view will overwrite any default values. Unmapped variables will get values from the Request Message screen. Variables under the Header and URL categories can only be Simple. Variables under the Body category can be Simple, Complex, Typed Array (Simple types or Complex) and Untyped Array.
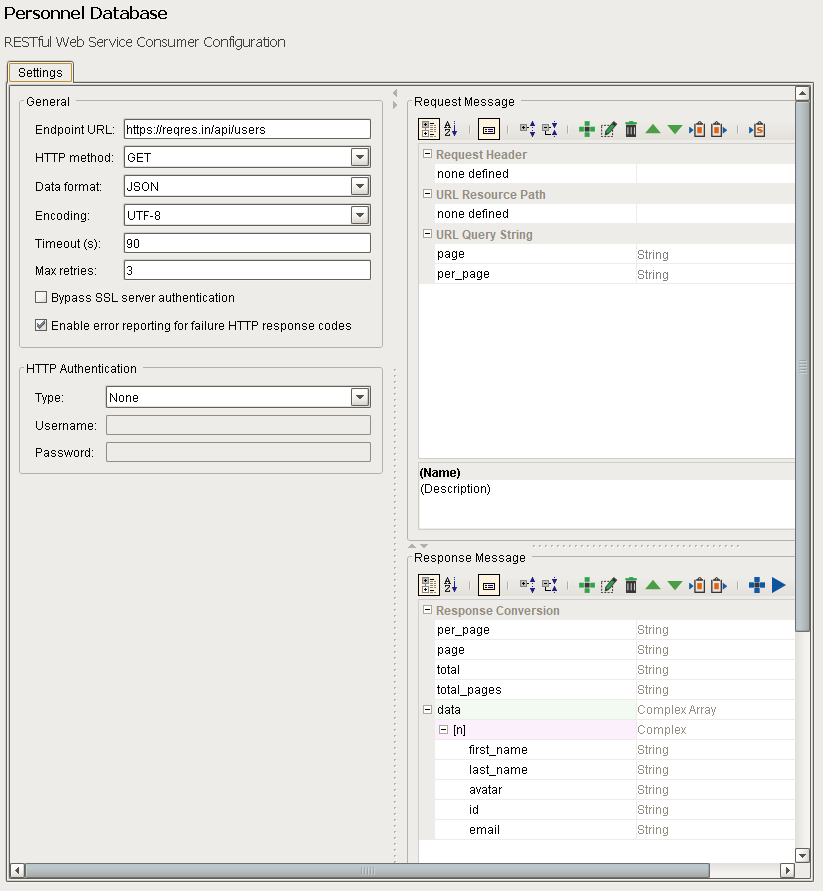
In this example, the RESTful provider https://reqres.in/api/users will return personnel records based on values appended as a URL query string. The RESTful consumer called Personnel Database is shown below, with the Request Message, consisting of a Header (Simple data type only, set to 'none defined'), URL Resource Path (Simple data type only, set to 'none defined') and two URL Query String entries, page and per_page. (these entries can be created as data type Simple, Complex, Typed Array (Simple types or Complex) or Untyped Array).
The Request Message section plays two roles: defining the Request structure and initializing any defined variables. Mapping into the Request Schema in the mapping view will overwrite default values. Unmapped variables will get values from the Request Message screen.
Creating the Response Schema
The Response (Output XSD) is defined in the Response Message section of the RESTful Configuration screen. Unlike the Request, the Response only has one section which is its Body and follows the same principals as the Request Body.
The Response Message block allows the user to define the Output schema and convert types. A conversion map will be created from the Response Body at run time. All simple types will be added to the map.
In this example, the Response only has one section which is its body and follows the same principals as Request Body. After configuring the Request Message, clicking the right-facing blue arrow (  ) in the Response Message pane will populate the body section (the Response Conversation) with the structure detected in the response received from the Restful provider. This provides insight into the formatting of the returned dataset, so a matching Chart Parameter structure can be created in the Start Block of the chart, to collect it and return it to the calling script in the button.
The Response Message block allows the user to define the output schema and convert types. A conversion map will be created from the Response Body at run time. All simple types will be added to the map.
Defined Variables
All of defined variables except for untyped arrays with children of different types will be converted to XSD nodes and displayed in the mapping view.
Special cases:
- Nested arrays will be assigned a name after their type (e.g. StringArray, DateTimeArray, etc).
- Untyped arrays with children of different types will not be converted. Therefore, there is no way to interact with them in Business Connector. However, the user can still use untyped arrays in scripting.
Naming
If any elements of the REST response/request contain characters that are illegal for XML (see https://www.w3schools.com/xml/xml_elements.asp) then they will be escaped using the following map:
Naming Character Escape Map
{char, escape_char} // HTML number CHAR Description
//------------------------------------------------------------
{"\t", "_-09."}, // 	 \t Tab
{" ", "_-32."}, //   \s Space
{"!", "_-33."}, // ! ! Exclamation mark
{"\"", "_-34."}, // " " Quotation mark
{"#", "_-35."}, // # # Number sign
{"$", "_-36."}, // $ $ Dollar sign
{"%", "_-37."}, // % % Percent sign
{"&", "_-38."}, // &(&) & Ampersand
{"'", "_-39."}, // ' ' Apostrophe
{"(", "_-40."}, // ( ( Left parenthesis
{")", "_-41."}, // ) ) Right parenthesis
{"*", "_-42."}, // * * Asterisk
{"-", "_-43."}, // + - Plus sign
{",", "_-44."}, // , , Comma
{"/", "_-47."}, // / / Slash
// Colon is allowed in XML names but is reserved for namespaces
// {":", "_-58."}, // : : Colon
{";", "_-59."}, // ; ; Semi-colon
{"<", "_-60."}, // <(<) < Less than
{"=", "_-61."}, // = = Equals sign
{">", "_-62."}, // >(>) > Greater than
{"?", "_-63."}, // ? ? Question mark
{"@", "_-64."}, // @ @ Commercial at
{"[", "_-91."}, // [ [ Left square bracket
{"\\", "_-92."}, // \ \ Reverse solidus (backslash)
{"]", "_-93."}, // ] ] Right square bracket
{"^", "_-94."}, // ^ ^ Caret
{"`", "_-96."}, // ` ` Acute accent
{"{", "_-123."}, // { { Left curly brace
{"|", "_-124."}, // | | Vertical bar
{"}", "_-125."}, // } } Right curly brace
{"~", "_-126."}} // ~ ~ TildeBusiness Connector Chart
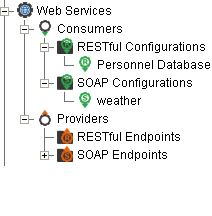
The chart is simply a few Chart Parameters defined in the Start Block and a RESTful Action Block configured to interface with a RESTful Consumer in the Web Services section of the Project Browser (which interfaces with a web-based RESTful provider site that holds the personnel records).
The Start Block has three Chart Parameters defined:
- page = integer, used to indicate which page of personnel records to display (broken into N records per page by the per_page value)
- per_page = integer, used to indicate how many records per page the personnel records will be broken into.
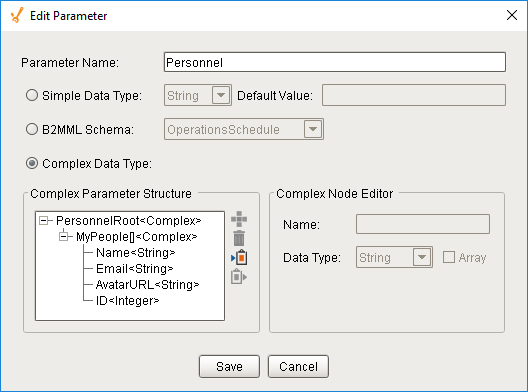
- Personnel = complex (see below), used to collect the returned list of personnel records upon completion of chart execution. The structure is designed to be compatible for mapping with the dataset returned by the RESTful provider.
The RESTful Action Block points to the Web Services RESTful consumer called Personnel Database.
In the Input mapping tab, Chart Parameters page and per_page are added ( ) and then mapped to their corresponding URL Query String instances. These strings will be added as a suffix to the RESTful provider site address as follows:
https://reqres.in/api/users?page=2&per_page=5 (where page = 2 and per_page = 5)
In the Output mapping tab, Chart Parameter Personnel is added ( ). The query response from the RESTful provider site (in the left-hand pane) is then mapped to Personnel, for return via the chart execution function in the Get Records button that triggered the query). A script is added to the Name property in the Chart Parameter Personnel, to string together first_name and last_name being returned in the RESTful provider response dataset (see below).
"Get Records" Button Script
When the button is pushed, the script will:
- Read the two Ignition Spinner components to get the page number (pageNum) and number-per-page (numPerPage) values and package them as a Python dictionary.
- Execute the Test/Personnel RESTful chart using the system.mes.bc.executeChartSynchronous function, passing in the two page-related values.
- The RESTful Action Block in the chart will trigger the Personnel Database RESTful consumer, previously configured in the Web Services section of the Project Browser.
- Personnel Database will push out a URL that includes the page-related values as a URL query string to the RESTful provider https://reqres.in/api/users and store the response in Chart Parameter Personnel.
- Upon completion of chart execution, complex_param will be loaded with a returned Python dictionary containing the personnel records stored in Personnel.
- Strip away the wrapper of the returned dataset, leaving only the personnel records as a list of dictionaries.
- Build an Ignition Dataset in DataToTable, comprised of a header and one row per personnel record, or if no records were returned, it will build an empty dataset with the header "NO RECORDS".
- Push the final dataset to the Power Table (see image of the user-interface screen above).
Get Records button script
Code |
|
Sepasoft MES Module Suite