---
title: "Mapping"
id: "mapping"
project: "MES User Manual"
url: "https://docs.sepasoft.com/articles/user-manual/mapping"
updated: 2026-07-31T14:57:00Z
---
# Mapping
**Sepasoft MES Module Suite**
### Mapping in Business Connecor
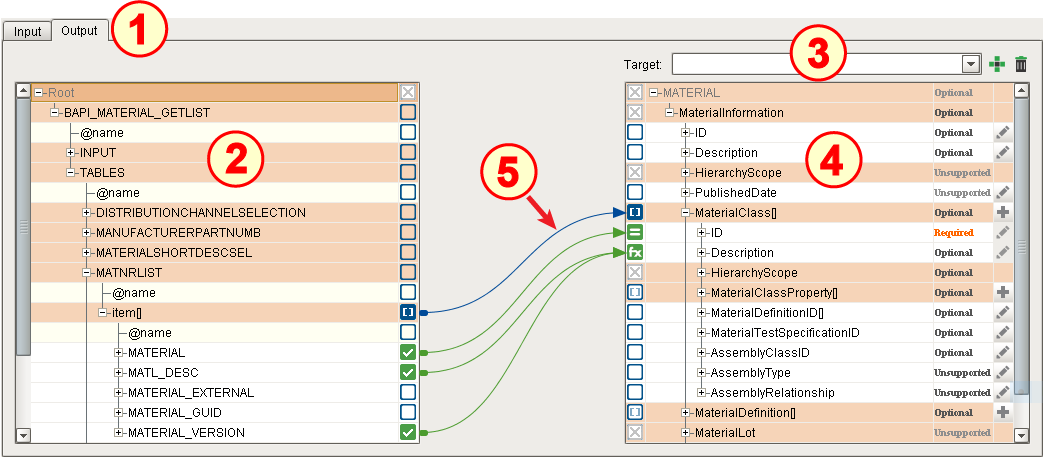
The bottom panel in the Business Connector module is the Mapping area. It is a visual GUI designed to facilitate mapping properties in the connected business system to equivalent properties in B2MML or in user-defined parameters. Beyond just like-to-like mapping, the Mapping area is capable of employing user-created Python scripts to clean, convert, filter and/or error-check business system property data before passing the results into the selected output property. In addition, *multiple* business system properties can be connected to a single MES Object property and pre-processed with scripting (example: business system properties for material Type and Description can be joined together into a single string to map into an MES Object Material Description property).
**1. Business System Input and Output Tabs**
Input: Data schema (such as from an SAP database) or a Chart Parameter (defined in the Start Block) to map over (read) into a B2MML schema or Chart Parameter.
Output: B2MML or Chart Parameters to map back into (write) the business system.
**2. Source Properties**
Hierarchical tree listing of the Input or Output source schema defined above.
**3. Destination Properties Drop-down Menu**
Drop-down selection menu of available destination Parameters. This drop-down appears only when required, depending on the Action Block.
**4. Destination Properties**
Hierarchical tree listing of the B2MML schema or Chart Parameter selected and added from the drop-down menu above.
**5. Mapping Connector**
Establishes a direct like-to-like mapping connection between the two schema entities.
* * *
# Making Mapping Connections
To create (add) a mapping connection:
1. Select either the **Input** or the **Output** tab on left side.
2. Expand the properties tree until the desired business system property is visible.
3. On the right side (destination side), if a drop-down menu exists, make your selection and click **Add** ( ).
4. Expand the properties tree until the desired destination property is visible.
5. (See demo below) Left-click and hold in the empty box to the right of the business system property and drag a connector arrow over to the desired destination property field on the right. Hover over the empty box and release the mouse button. The connection will remain, as indicated by the green check mark ( ).
6. (Optional) Repeat to connect the business system property to *another* MES Object property (business system properties may be connected to multiple B2MML or Chart Parameter properties).
7. (Optional) Repeat to connect additional business system properties to the *same* destination property (multiple incoming properties must be handled with scripting).
Required Connections
|  | Make sure connections marked as "**Required**" have connections or have been verified as not being actually required, or an error will occur during chart execution (in some circumstances, connecting only one of several properties shown as "**Required**" may be sufficient for proper mapping). |
| --- | --- |

### Viewing Complex Array Children
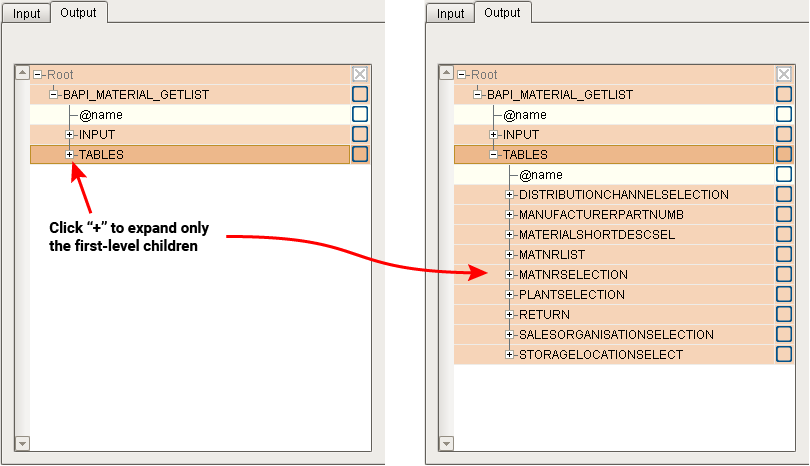
There are two methods for viewing/hiding available array members. The first method is to use the plus or minus sign to the left of an array member, as shown below. This only expands the immediate first-level children of the selected array member.
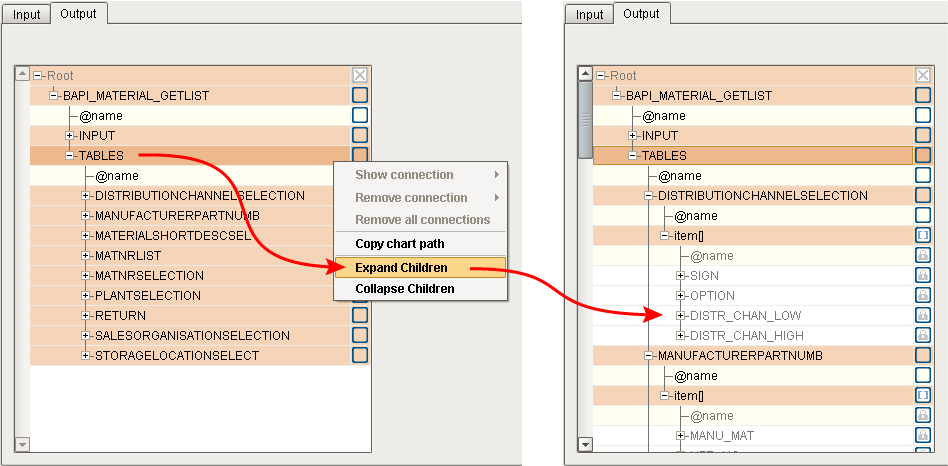
The second method is to right-click on an array member and select **Expand Children** or **Collapse Children**. This expands/collapses all of the available children of the selected array member (but does not expand any associated attribute elements).
Properties
Mapping Mismatched Data Types
|  | The mapper allow you to map together parameters with mismatched data types, but you must do the appropriate type conversion in a script function at the receiving parameter. Refer to [Mapping Connection Scripts](/articles/user-manual/mapping/a/Mapping-MCS) below.
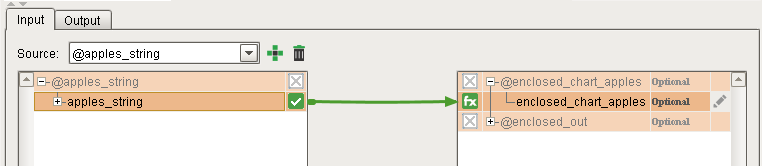
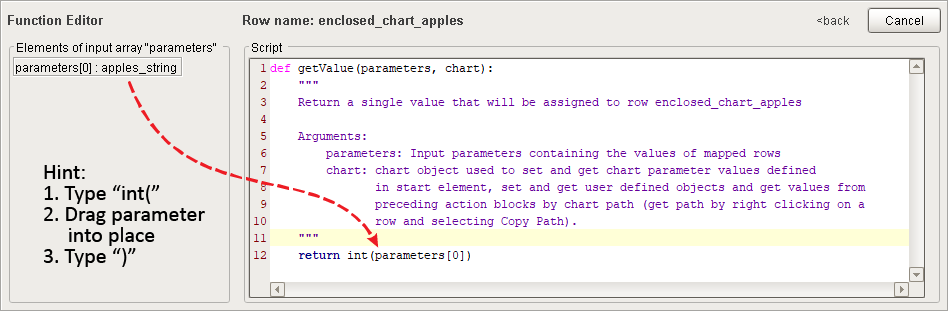
Example: For mapping the string parameter ***apples\_string*** to the integer parameter ***enclosed\_chart\_apples***, a one-line script function ( ) is added to the ***enclosed\_chart\_apples*** parameter to do the data type conversion, as shown below:
 |
| --- | --- |
In the example below, mapping is being configured for an [Enclosing Chart Block](/docs/display/BC/Enclosing-Chart-Block).
One of the other available charts in the project is selected to be the 'enclosed' chart.

### Passing Chart Parameter to the Enclosed Chart
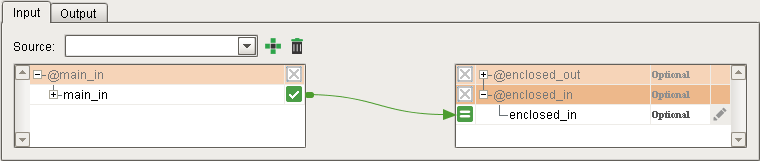
In this example, the Chart Parameter ***main\_in*** will be passed to the enclosed chart's ***enclosed\_in*** Chart Parameter (data types must match):
### Passing Chart Parameter to the 'Parent' Chart
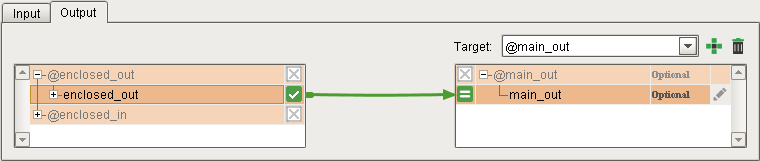
In this example, the enclosed chart's ***enclosed\_out*** Chart Parameter will be passed to the 'parent' chart's ***main\_out*** Chart Parameter (data types must match):
### Display Existing Mapping Connections
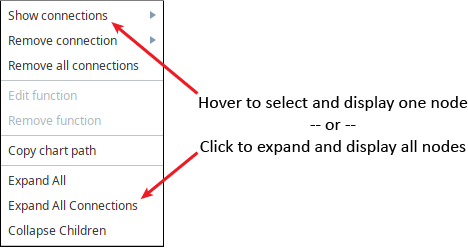
To display an existing mapping connection, right-click on any node (on either the source or the destination side) with a green check mark ( ), hover over **Show Connections** and then select the name of the source/destination node that it is connected to. The green mapping connection line will be displayed. Alternatively, you can display all connections at once by selecting **Expand All Connections** from the right-click menu.
### Date Formatting
Date fields on the destination side can be custom-formatted by right-clicking and selecting **Edit fixed value**. In the dialog box, enter the date-formatting string. When a date from the source side is mapped over, the stored date will be converted to match the formatting representation. Refer to the Ignition page [Data Type Formatting Reference](https://docs.inductiveautomation.com/display/DOC81/Data-Type-Formatting-Reference) for details on using the available formatting characters.
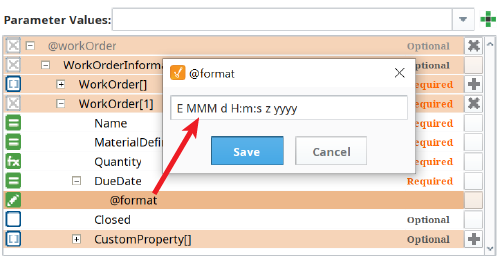
|  | If necessary, custom date conversion can also be achieved via a mapping script, but for most user requirements, the date-formatting dialog box will be a quick and convenient tool. |
| --- | --- |
* * *
# Removing a Mapping Connection
To remove (delete, disconnect) an existing mapping connection:
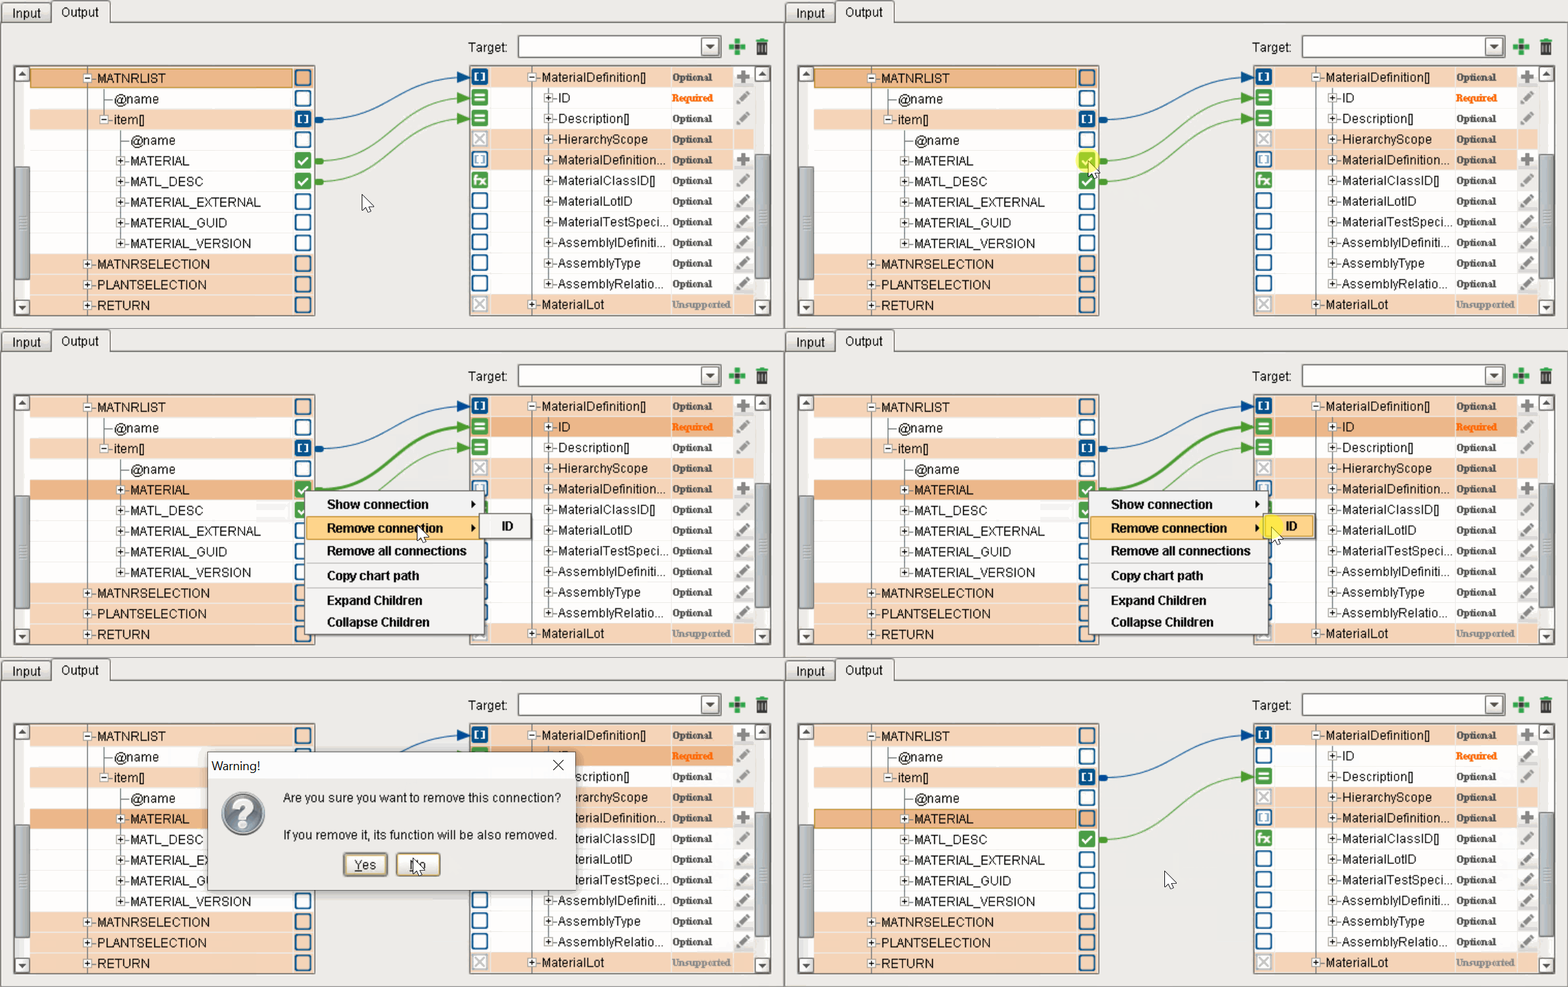
1. Right-click on the box for the business system property that is to be disconnected.
2. Hover over **Remove connection** then click the name of the destination property to be disconnected.
3. Confirm the removal at the dialog box.
4. The connector arrow will disappear.
|  | When a mapping connection is removed, any script present in the destination property will also be removed (deleted). |
| --- | --- |
* * *
# Mapping Connection Scripts
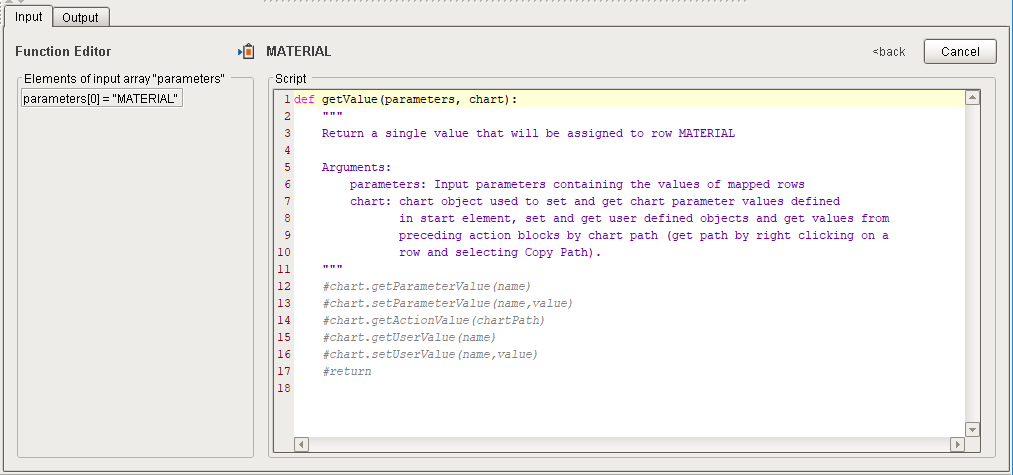
The mapping connection to any property within the destination properties tree can optionally employ a user-created Python script to assist in cleaning, converting, filtering and error-checking business system property data before passing them into the selected destination property.
When a new script is created (see instructions below), the script area is pre-populated with the function definition (with its expected parameters), as well as instructions and all of the available function methods (commented out). Users can remove the hash comment character from the function method to be used, as well as for the return statement, then complete the script.
Refer to [Scripting a Mapping Connection](/docs/display/BC/Scripting-a-Mapping-Connection) for scripting assistance.
* * *
# Adding/Deleting Array Members
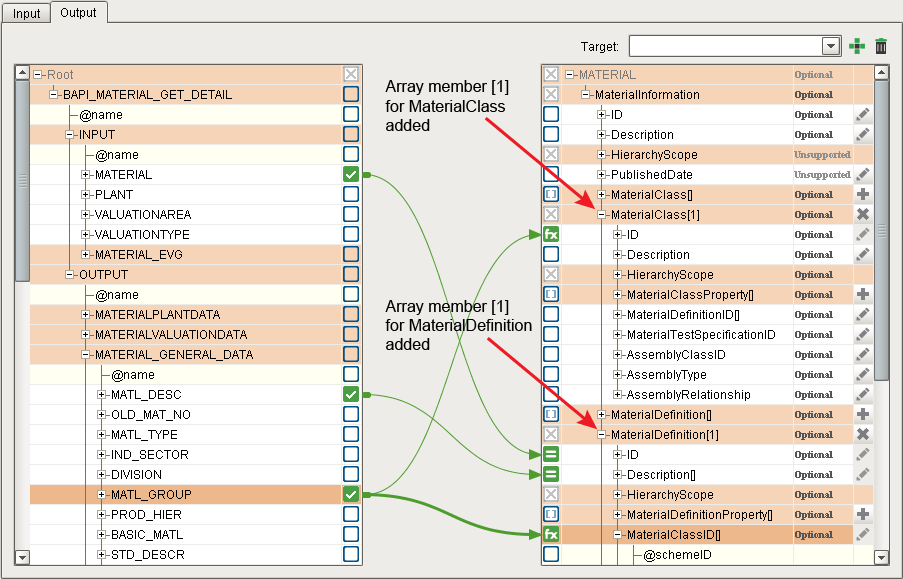
When mapping a single complex element into a complex array, such as a B2MML structure, it is necessary to create a single instance to map to (a single element cannot map into an array). Click the **Add an array element** button ( ) to the right of any array member (ends with a pair of brackets "[]") and a single-member copy will be created with "[1]" as the index, as shown to the right. Clicking the **Add an array element** button again will create a second array member with "[2]", and so on.
Once a single array member is created, a single array member from the source column can be mapped to it. This is useful in situations such as when using the SAP function BAPI\_MATERIAL\_GET\_DETAIL, which is a single array member (as shown below) and hence requires being mapped to a single array member.
To delete an array member, click the **Delete row** button ( ).
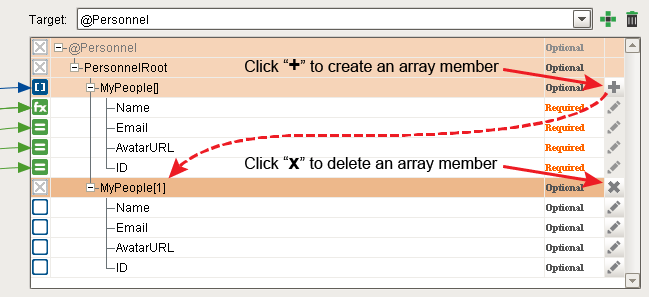
**Example:** Mapping a single-instance array member (no "[]") returned by the SAP function ***BAPI\_MATERIAL\_GET\_DETAIL*** to a B2MML array by first adding defined, single-instance array members (ending with "[1]") that type match with their sources:
XML Elements and Attributes
|  | For more information on XML elements and attributes: [https://www.w3schools.com/xml/xml_attributes.asp](https://www.w3schools.com/xml/xml_attributes.asp) |
| --- | --- |
Non XML 1.0 Characters
|  | Only XML 1.0 character codes are allowed with Business Connector. Characters that are returned from an ERP by the [SAP BAPI Action Block](/docs/display/BC/SAP-BAPI-Action-Block) and [SAP RFM Action Block](/docs/display/BC/SAP-RFM-Action-Block) that are not included in XML 1.0 will be replaced with “□” (U-25A0 Black Square Unicode). The squares will be passed along with the data (including being saved with MES Object data), so it is up to the user to clean them from data being sent by the ERP. |
| --- | --- |
Tracing Mapping Connections
|  | There are various levels of logging available in Ignition Designer. When needed, you can switch Business Connector Action Block mapping parameters to 'Trace' and verify the mapping connections. Refer to this Sepasoft Knowledge Base article for instructions:
[Business Connector: Tracing Mapping Connections](/docs/pages/viewpage.action?pageId=36799246) |
| --- | --- |
**Sepasoft MES Module Suite**