---
title: "MQTT Store and Forward"
id: "mqtt-store-and-forward"
project: "MES User Manual"
url: "https://docs.sepasoft.com/articles/user-manual/mqtt-store-and-forward"
updated: 2026-07-31T14:58:19Z
---
# MQTT Store and Forward
**Sepasoft MES Module Suite**
### MQTT Overview
MQTT (Message Queue Telemetry Transport) is a machine-to-machine data transfer protocol. It is the most popular messaging protocol for Internet of Things (IoT) and Industrial Internet of Things (IIoT). MQTT allows to securely connect, publish, and subscribe to data.
#### MQTT Modules Download
MQTT modules by Cirrus Link Solutions are designed specifically for the integration of MQTT data and building IIoT/SCADA/MES solutions.
|  | - MQTT is used with IoT and IIoT to publish and subscribe data.
- Especially effective in high latency situation.
- Sepasoft module tag collectors work with MQTT supporting integration of IoT/IIoT and MES.
|
| --- | --- |
The following example scenario explains installation and configuration of the Cirrus Link MQTT modules onto typical **Ignition Edge Gateway** and a **Central Ignition Gateway** that will use tags to communicate data for recording and storage (it assumes both gateways have already been installed and configured). The Edge Gateway is the source of incoming factory data via tags and the Central Ignition Gateway receives and records the tag values.
Once the installation and configuration completed, customize the tags and configuration as needed for your specific factory environment.
|  | This example uses **Ignition version 8.0.16**, **MQTT Modules version 4.0.5**, and **Sepasoft MES Modules 3.80.0**. |
| --- | --- |
####
Download MQTT Distributor, Engine and Transmission Modules
* On the Inductive Automation website, navigate to the Strategic Partner Modules tab (shows all available third-party modules).
* Use the two pull-downs for the desired Ignition version. Choose the same version as the central Ignition Gateway and the Edge Gateway you already have installed.
* Download the ***MQTT Distributor***, ***MQTT Engine*** and ***MQTT Transmission*** modules.
### MQTT Installation - Central Gateway
* On the central Ignition Gateway console browser page (e.g. http://localhost:8088-), navigate to **Configure** → **Modules** (in the **SYSTEM** section).
* At the bottom of the page, click **Install or Upgrade a Module** and select the **MQTT Distributor Module** file from your **Downloads** folder. Follow the instructions and agreements on the page to complete the installation.
* Repeat the step above to install the **MQTT Engine Module**.
#### Configure MQTT Engine Module
By default, the **MQTT Engine Module** is configured to point to an **MQTT Server** at tcp://localhost:1883, which means that it will automatically connect to the **MQTT Distributor Module** you installed with it.
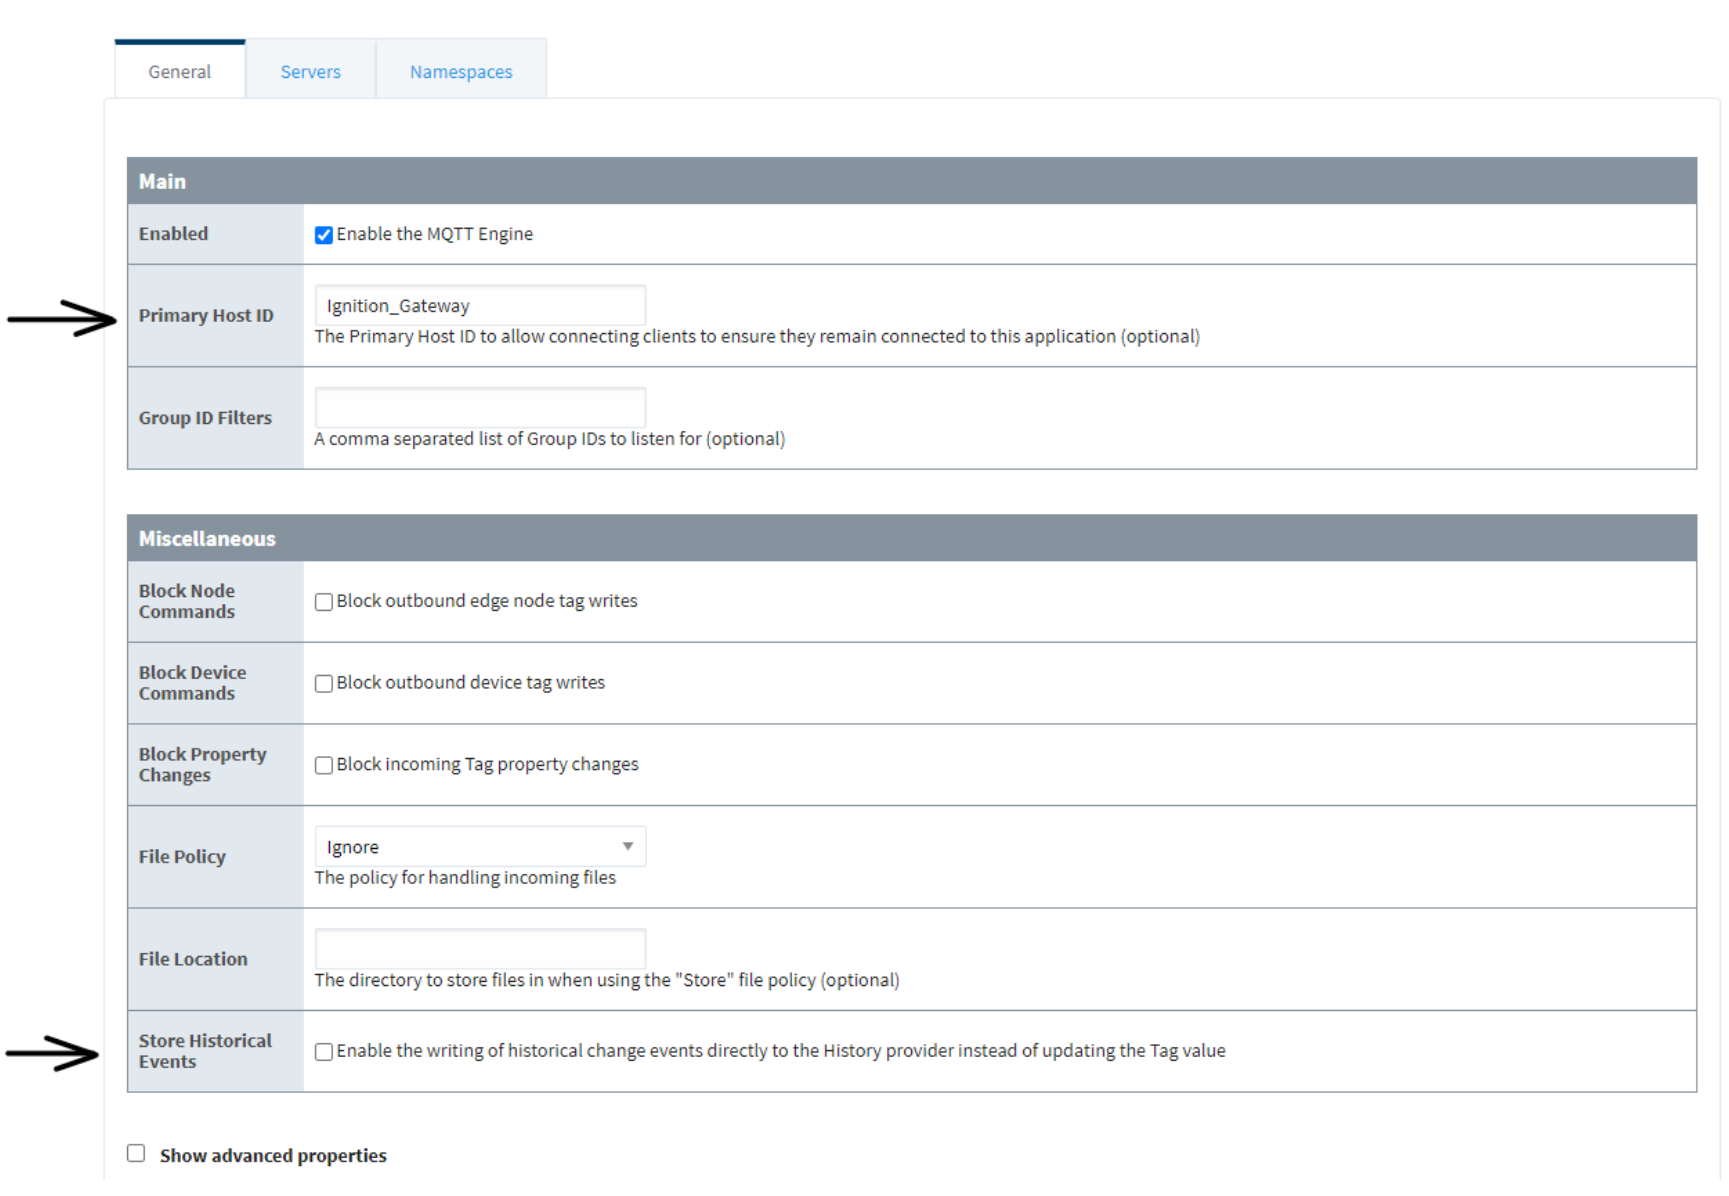
* In the **Configure** tab, scroll down to the **MQTT Engine** section and click **Settings**. Configure the following:
* In the **General** tab, change the **Primary Host ID** to a name string of your choice.
* In the **Miscellaneous** section, disable **Store Historical Events** (clear the check box).
* Click **Save Changes**.

#### Configure Chariot SCADA
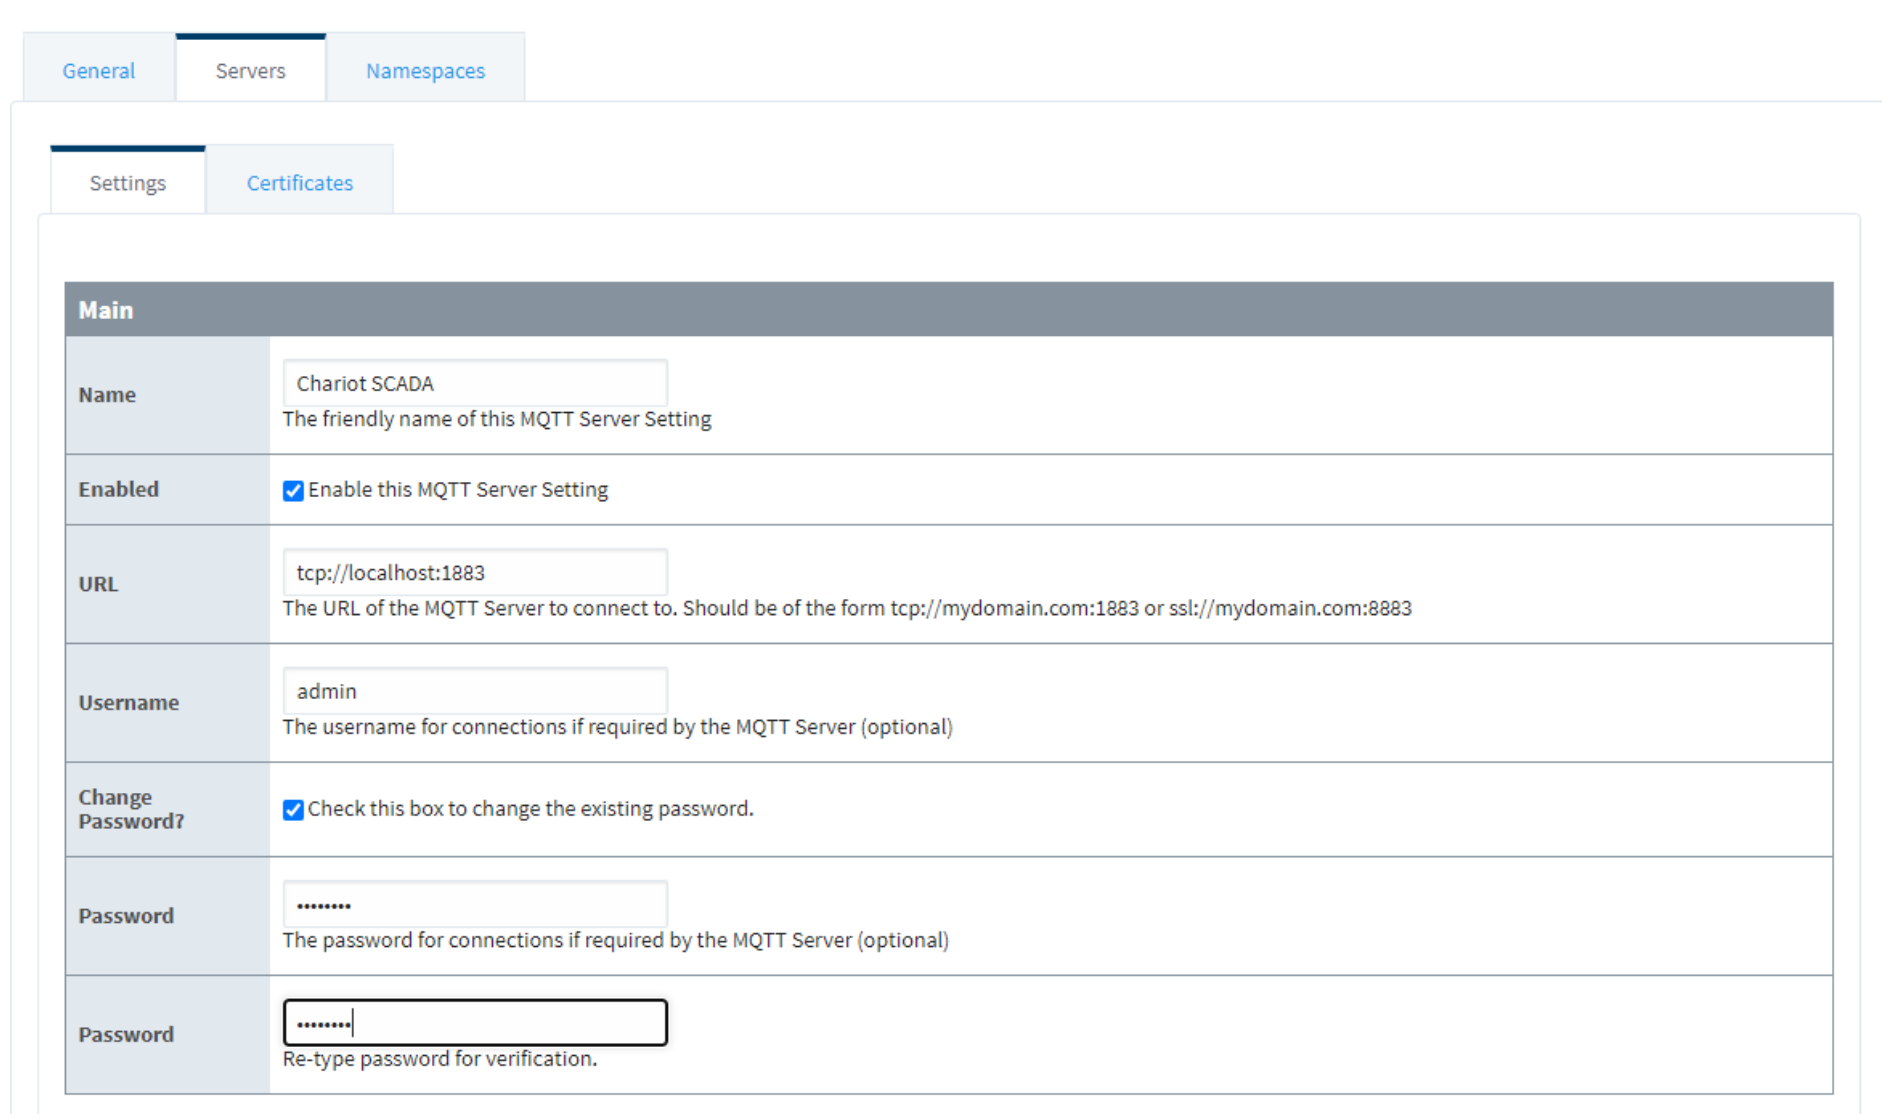
* While still in **Settings**, select the **Servers** tab to edit the default Chariot Scada, as follows:
* In the **Name** field, leave the default name string as "***Chariot SCADA***".
Note: This username will need to be set for all modules.
* Verify that the **Enable this MQTT Server Setting** checkbox is checked (enabled).
* Check the **Check this box to change the existing password** box and enter the Chariot SCADA's password in the two **Password** fields.
Note: The same password will need to be set for all modules.
* Click **Save Changes**.
#### Configure MQTT Distributor Module
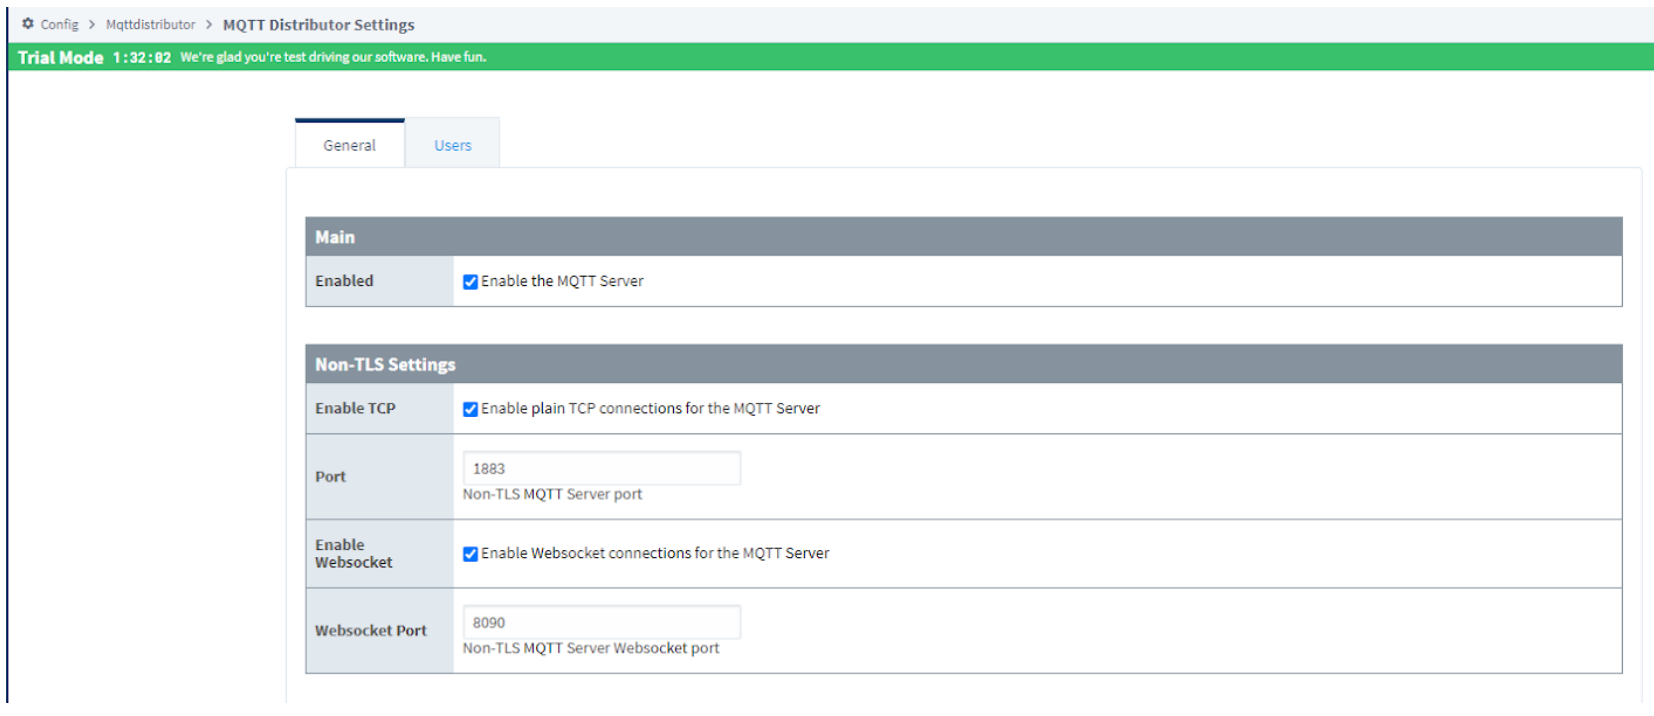
* In the **Configure** tab, scroll down to the **MQTT Distributor** section and click **Settings** (for this example scenario, the Non-TLS Connection is being used). Configure the following:
* Verify that the **Enable the MQTT Server** checkbox is checked (enabled).
* Verify that the **Enable Websockets connections for the MQTT Server** checkbox is checked (enabled).
* No change to the default port addresses were required for this example.
* Click **Save Changes**.
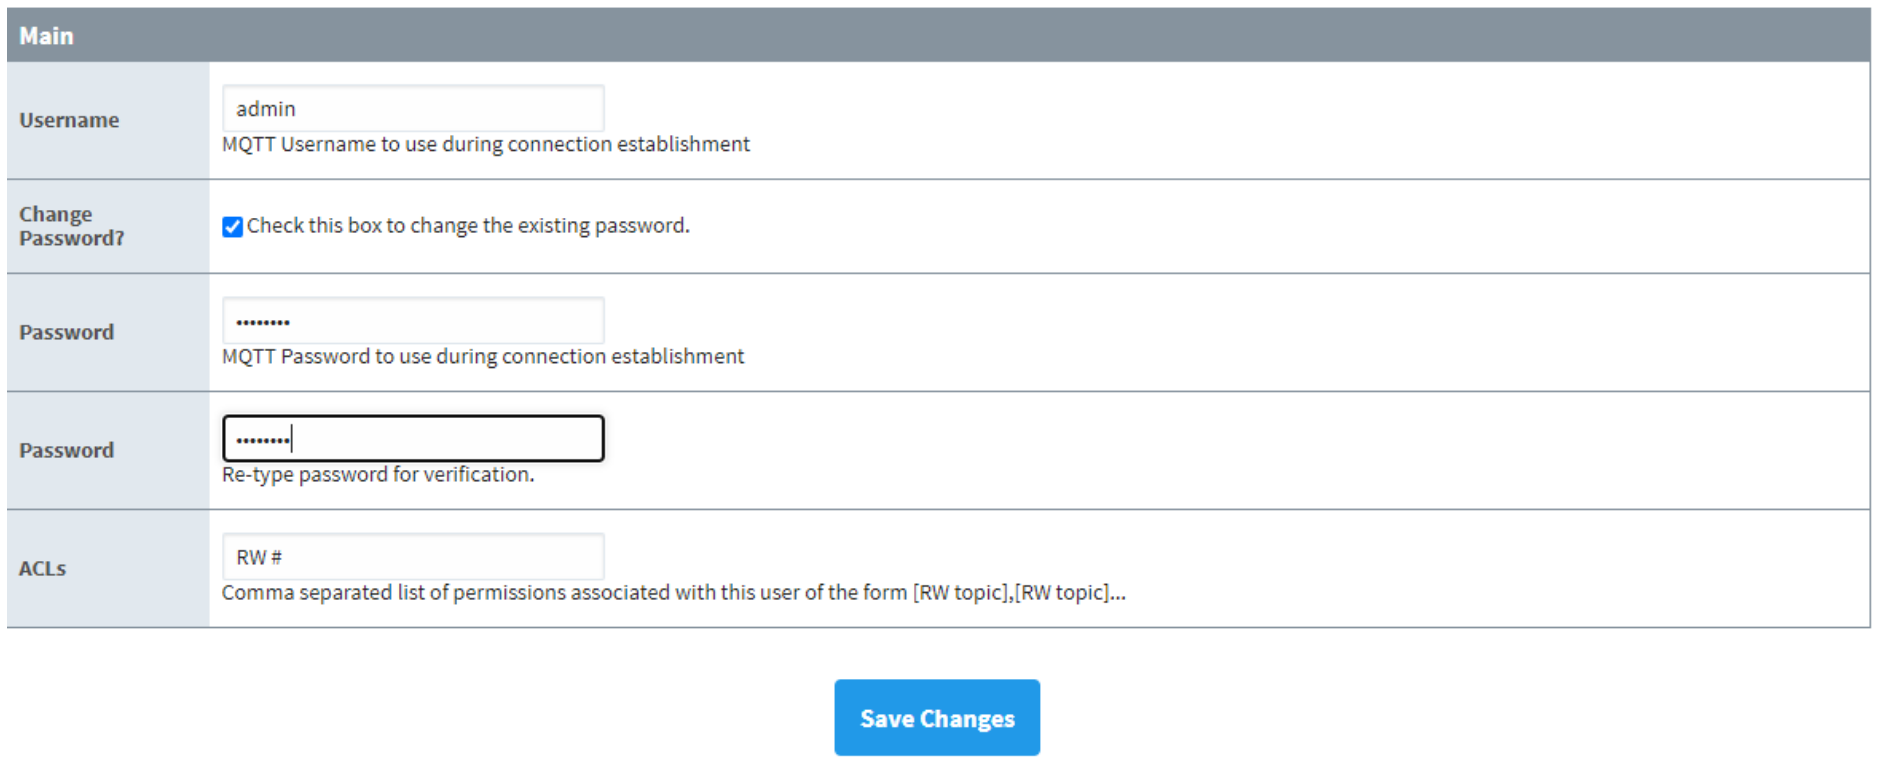
#### Configure Admin and Password
* Select the **Users** tab and change the **Username** field to the admin user you configured in the **MQTT Engine Module**.
* Check the **Check this box to change the existing password** box and type the password you selected in the **MQTT Engine Module** into both **Password** fields.
MQTT Installation - Edge Gateway
#### Install MQTT Transmission Module
* On the **Ignition Edge Gateway** server, open the gateway's console page and navigate to **Configure** → **Modules** (in the **SYSTEM** section).
* At the bottom of the page, click **Install or Upgrade a Module** and select the **MQTT Transmission Module** file from your **Downloads** folder. Follow the instructions and agreements on the page to complete the installation.
#### MQTT Configuration - Edge Gateway
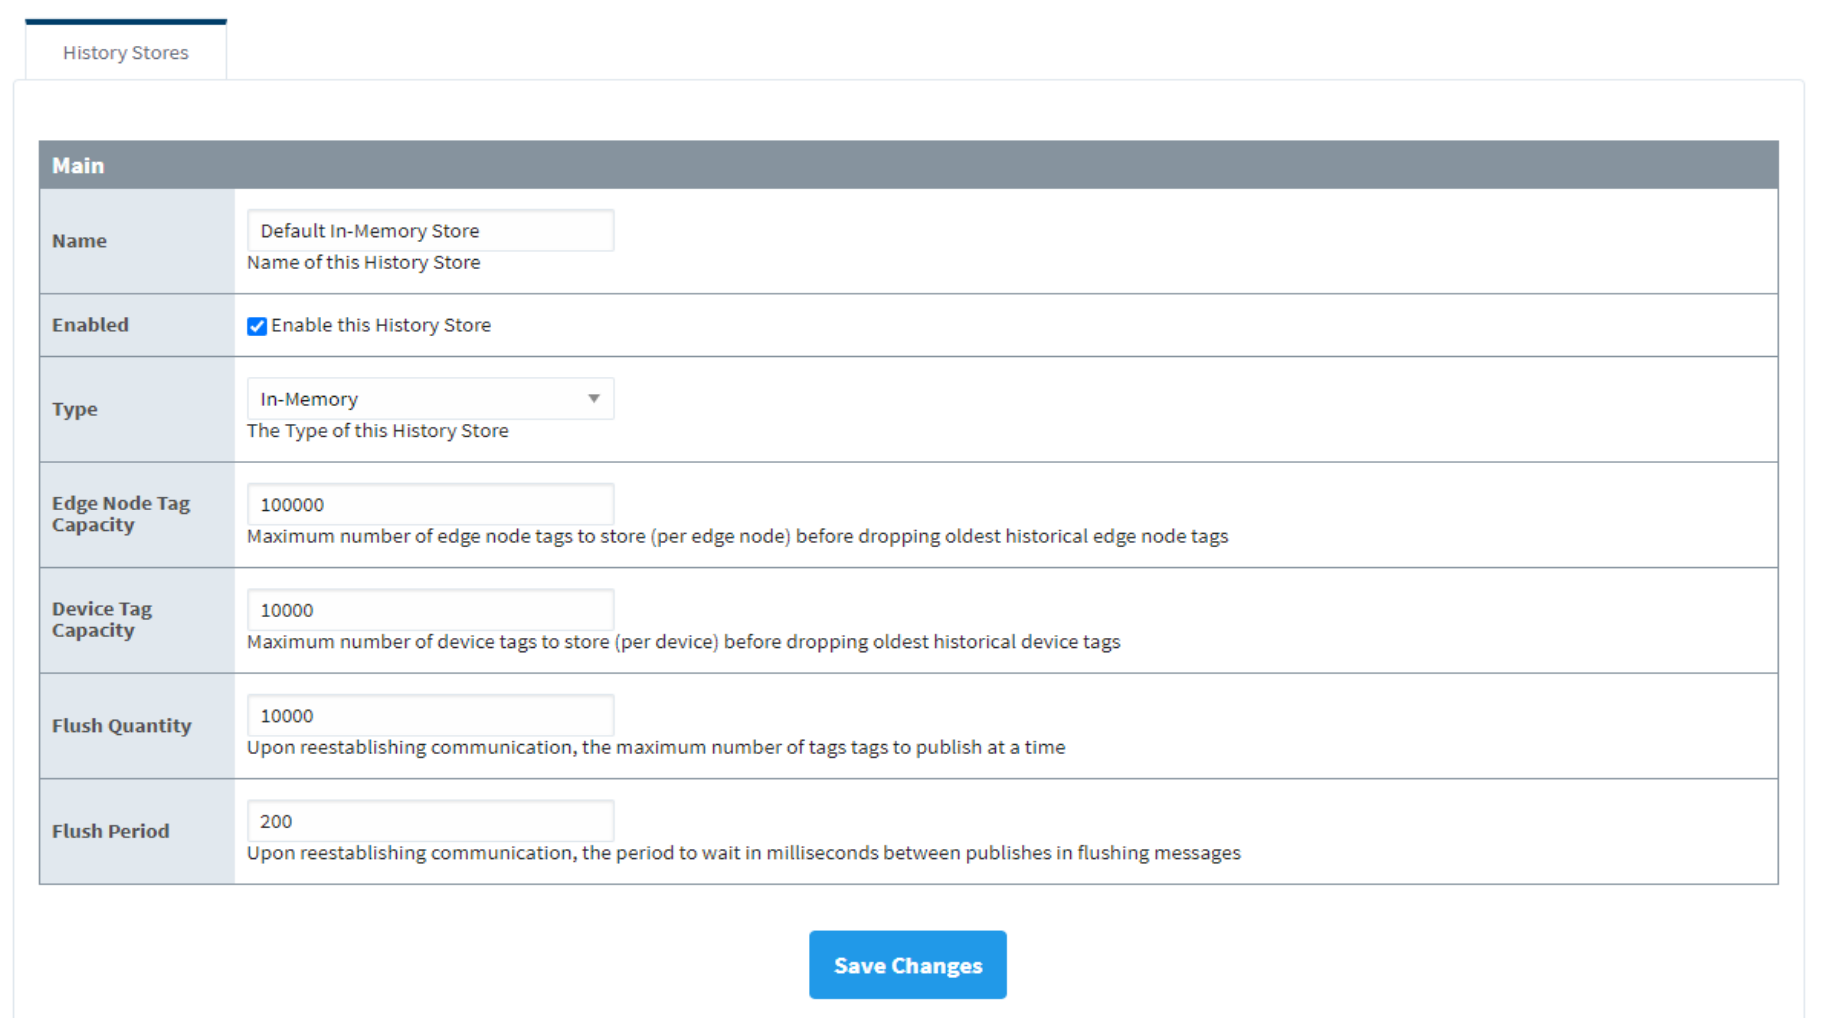
#### Configure MQTT Transmission History
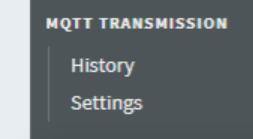
* In the **Configure** tab, scroll down to the **MQTT Transmission** section and click **History**. Configure the following:
* In the **History Stores** tab, edit the **Name** field to be "***Default In-Memory Store***".
* Verify that the **Enable this History Store** checkbox is checked (enabled).
* Change **Type** to ***In-Memory***.
* Click **Save Changes**.
#### Configure MQTT Transmission Module - General and Server Tabs
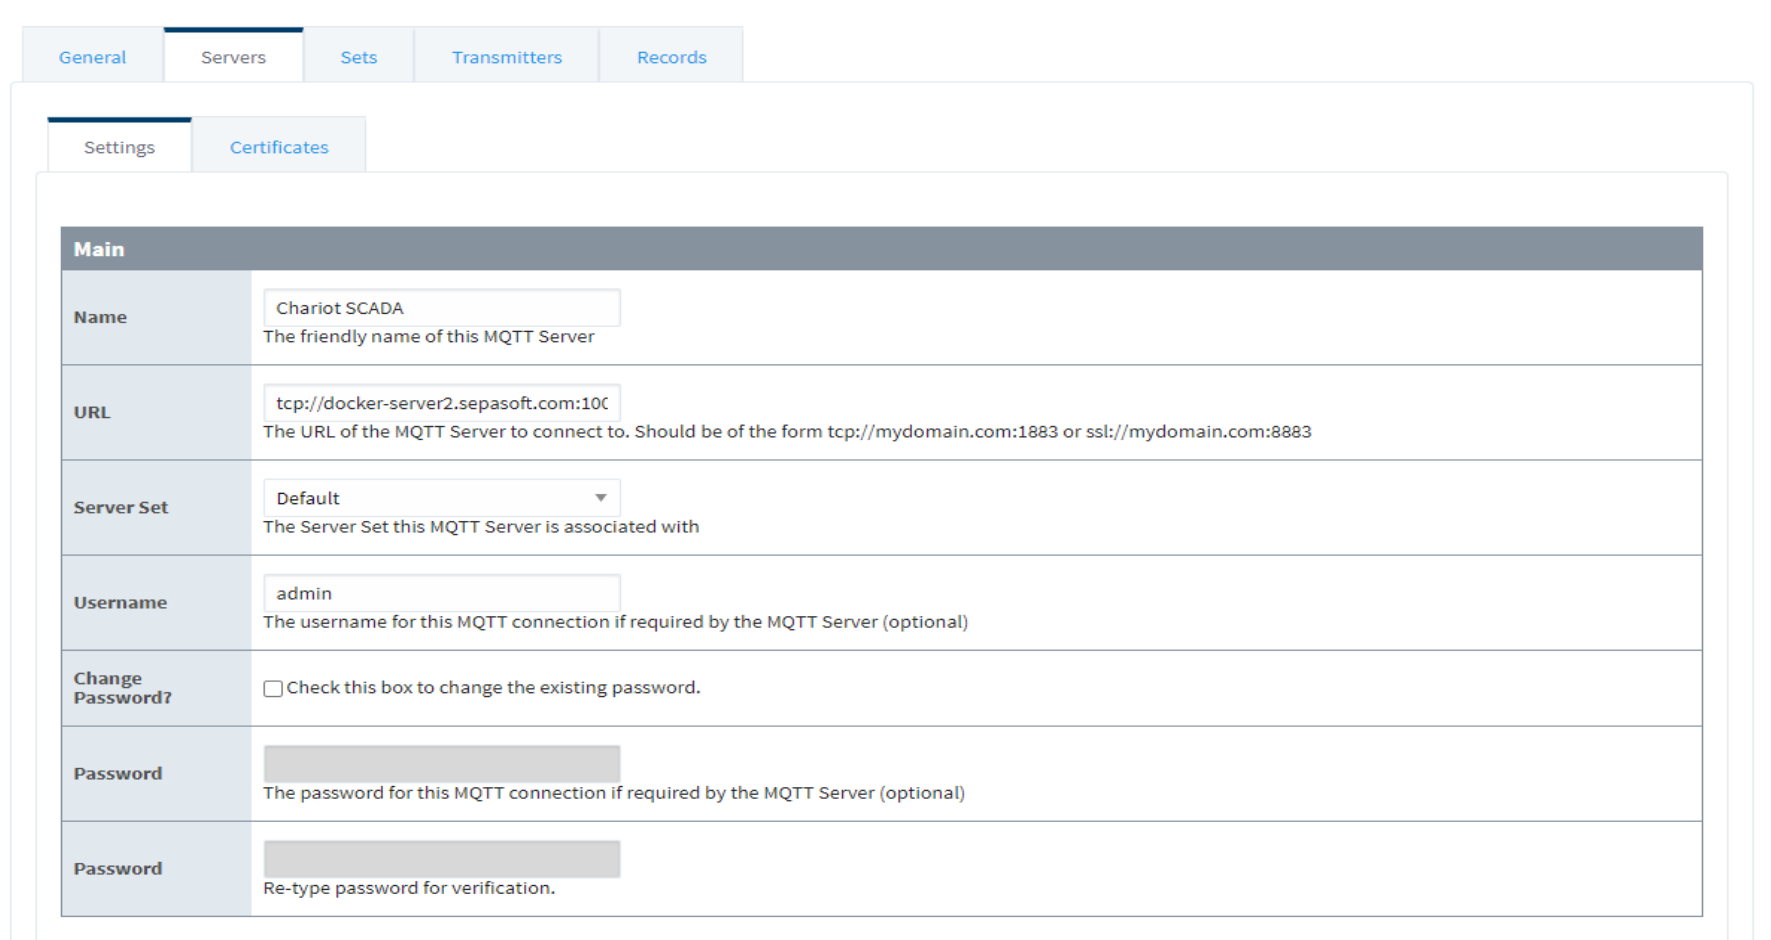
* In the **Configure** tab → **MQTT Transmission** section, click **Settings**. Configure the following:
* In the **General** tab, set the checkbox for **MQTT Transmission from connecting to the configured MQTT Servers** (enabled).
* In the **Name** field, leave the default name string as "***Chariot SCADA***".
Note: This username will need to be set for all modules.
* Enter the same Chariot SCADA connection password in the **Password** fields.
Note: The same password will need to be set for all modules.
* Modify the **URL** field to point to the **Ignition Distributor** gateway. Example: If the Gateway IP is ***10.1.10.97*** then set the **URL** field to tcp://10.1.10.97:1883.
* Verify that the **Server Set** is set to ***Default***.
* Click **Save Changes**.
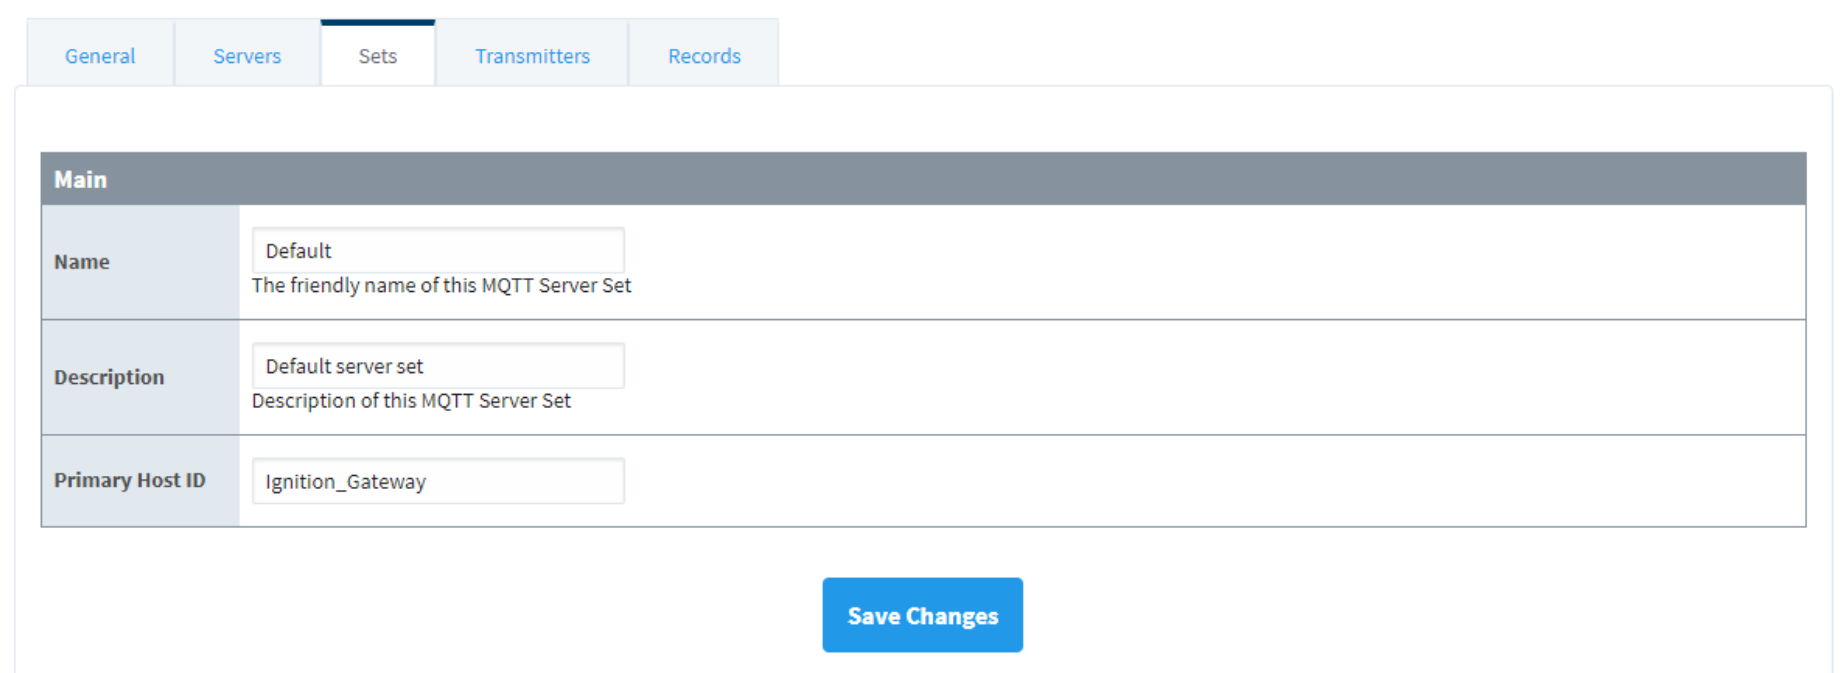
#### Configure MQTT Transmission Module - Sets Tab
* In the **Sets** tab, edit the **Primary Host ID** to be the same name string as entered for the **MQTT Engine Module** in the Central Ignition Gateway.
* Click **Save Changes**.
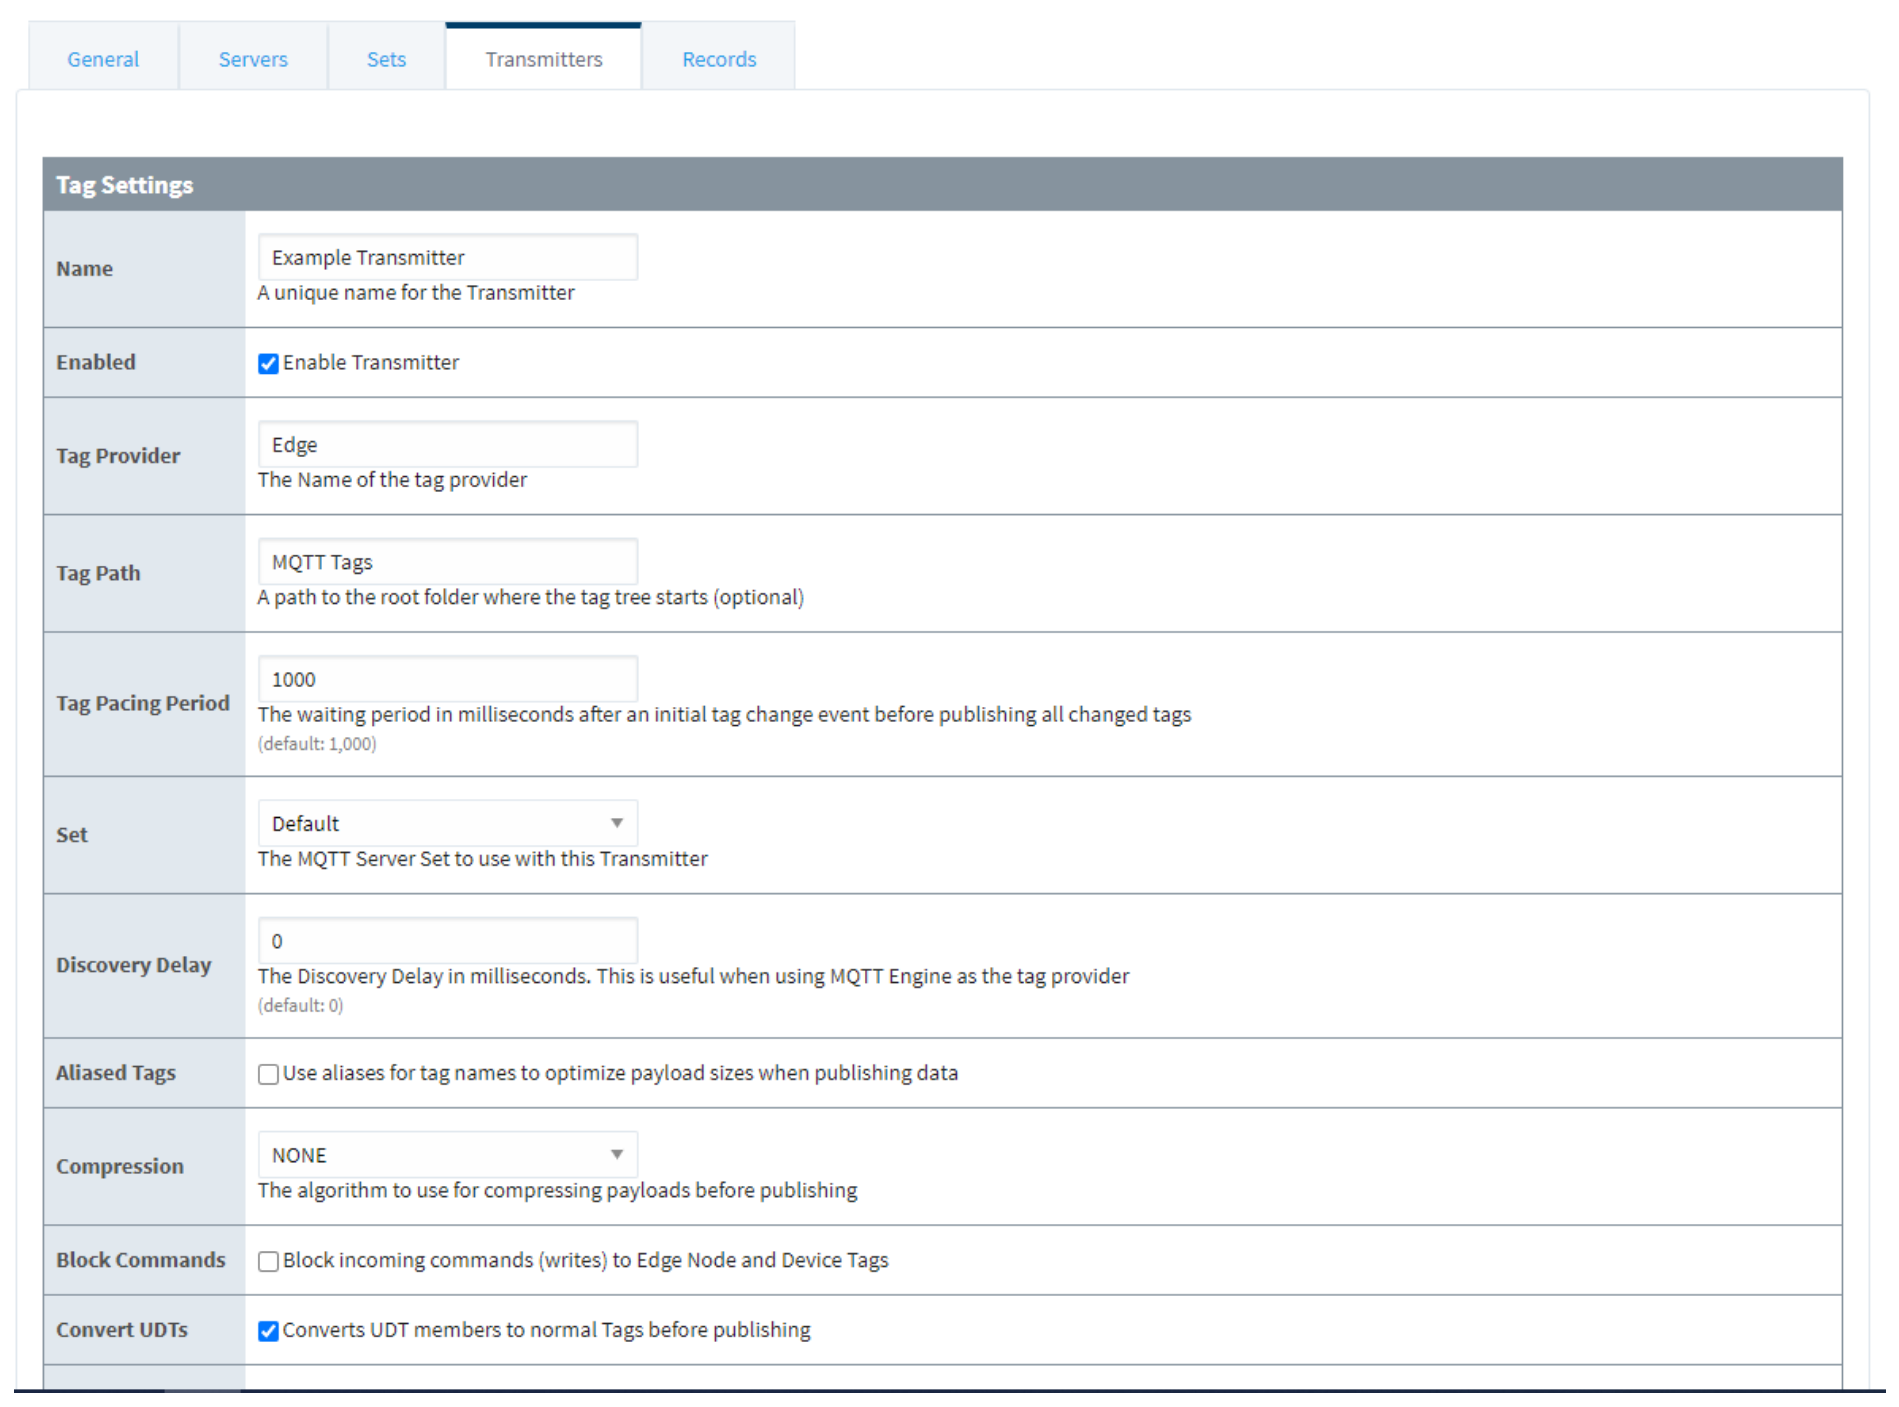
#### Configure MQTT Transmission Module - Tag Settings
* In the **Transmitters** tab → **Tag Settings** section:
* Verify that the **Enable Transmitter** check box is set (enabled).
* Set the **Tag Provider** field to "***Edge***" (Edge tags).
* Set the **Tag Path** field to "***MQTT Tags***".
* Verify that the **Set** field is set to ***Default***.
* Verify that the **Converts UDTs** checkbox is set (enabled).
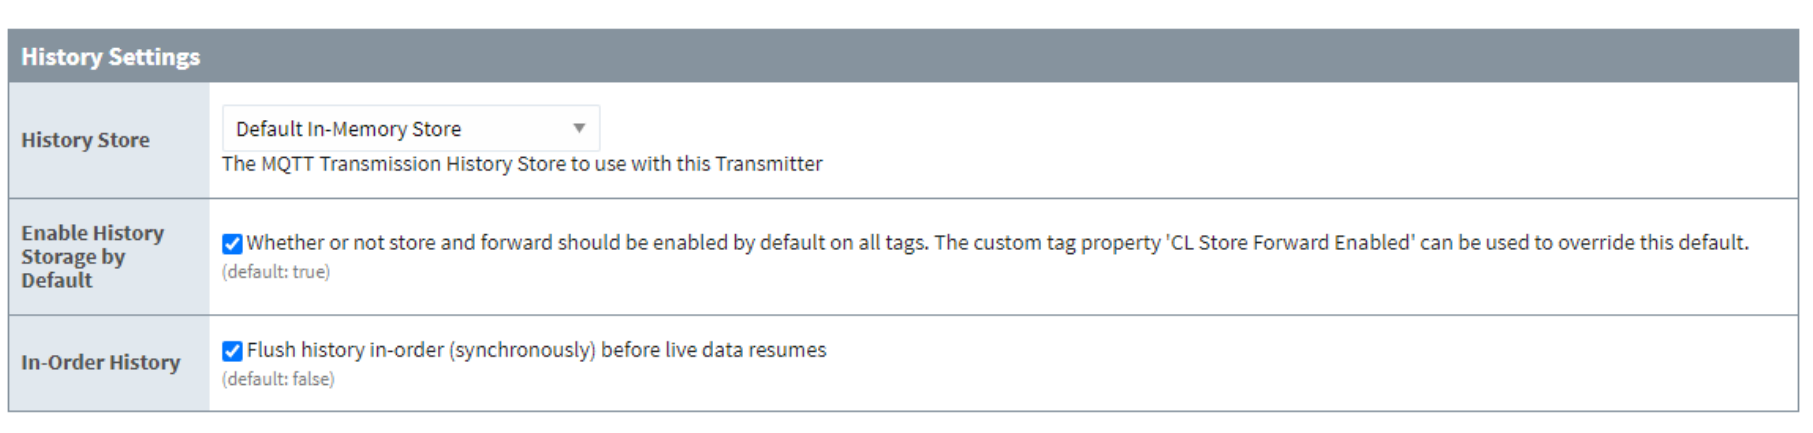
#### Configure MQTT Transmission Module - History Settings
* In the same **Transmitters** tab, scroll further down to the **History Settings** section:
* Change the **History Store** field to the ***Default In-Memory Store*** selection.
* Verify that the **Enabled History Storage by Default** checkbox is set (enabled).
* Set the checkbox for **In-Order History** (enabled).
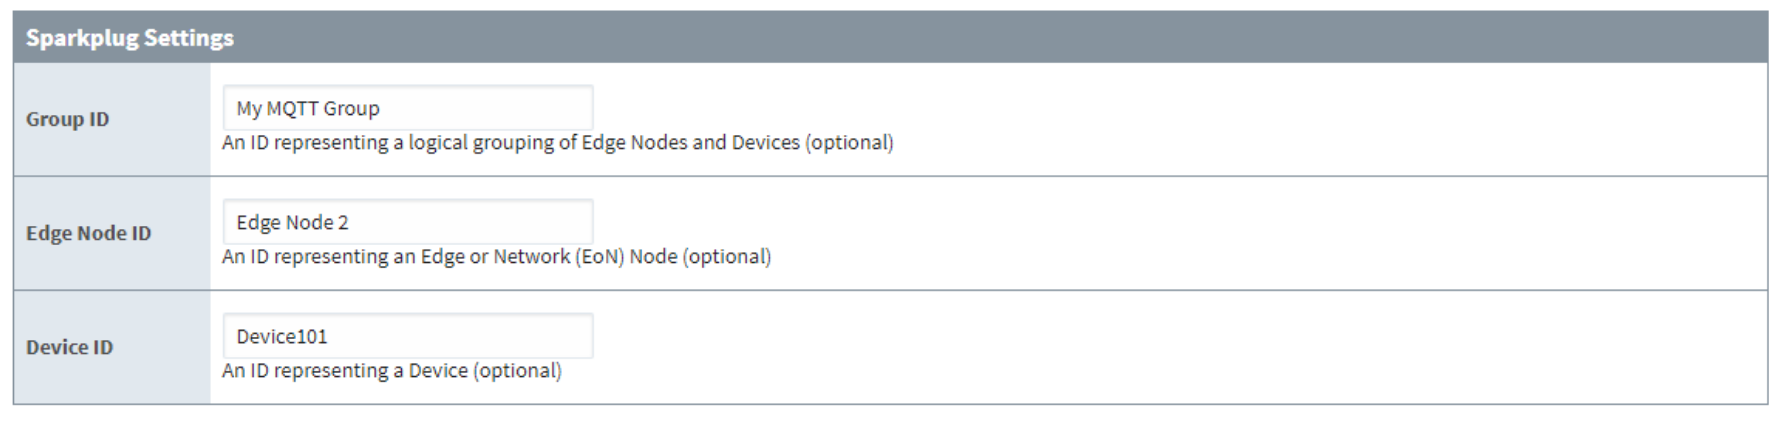
#### Configure MQTT Transmission Module - Sparkplug Settings
* In the same **Transmitters** tab, scroll further down to the **Sparkplug Settings** section:
* Choose a name string for the **Edge Node ID** field.
* Choose a **Device ID**.
* Click **Save Changes** to save all the edits to the **MQTT Transmission** page.
Launch Edge Designer and Configure Edge Tags
* Launch **Designer** for the **Edge Gateway**.
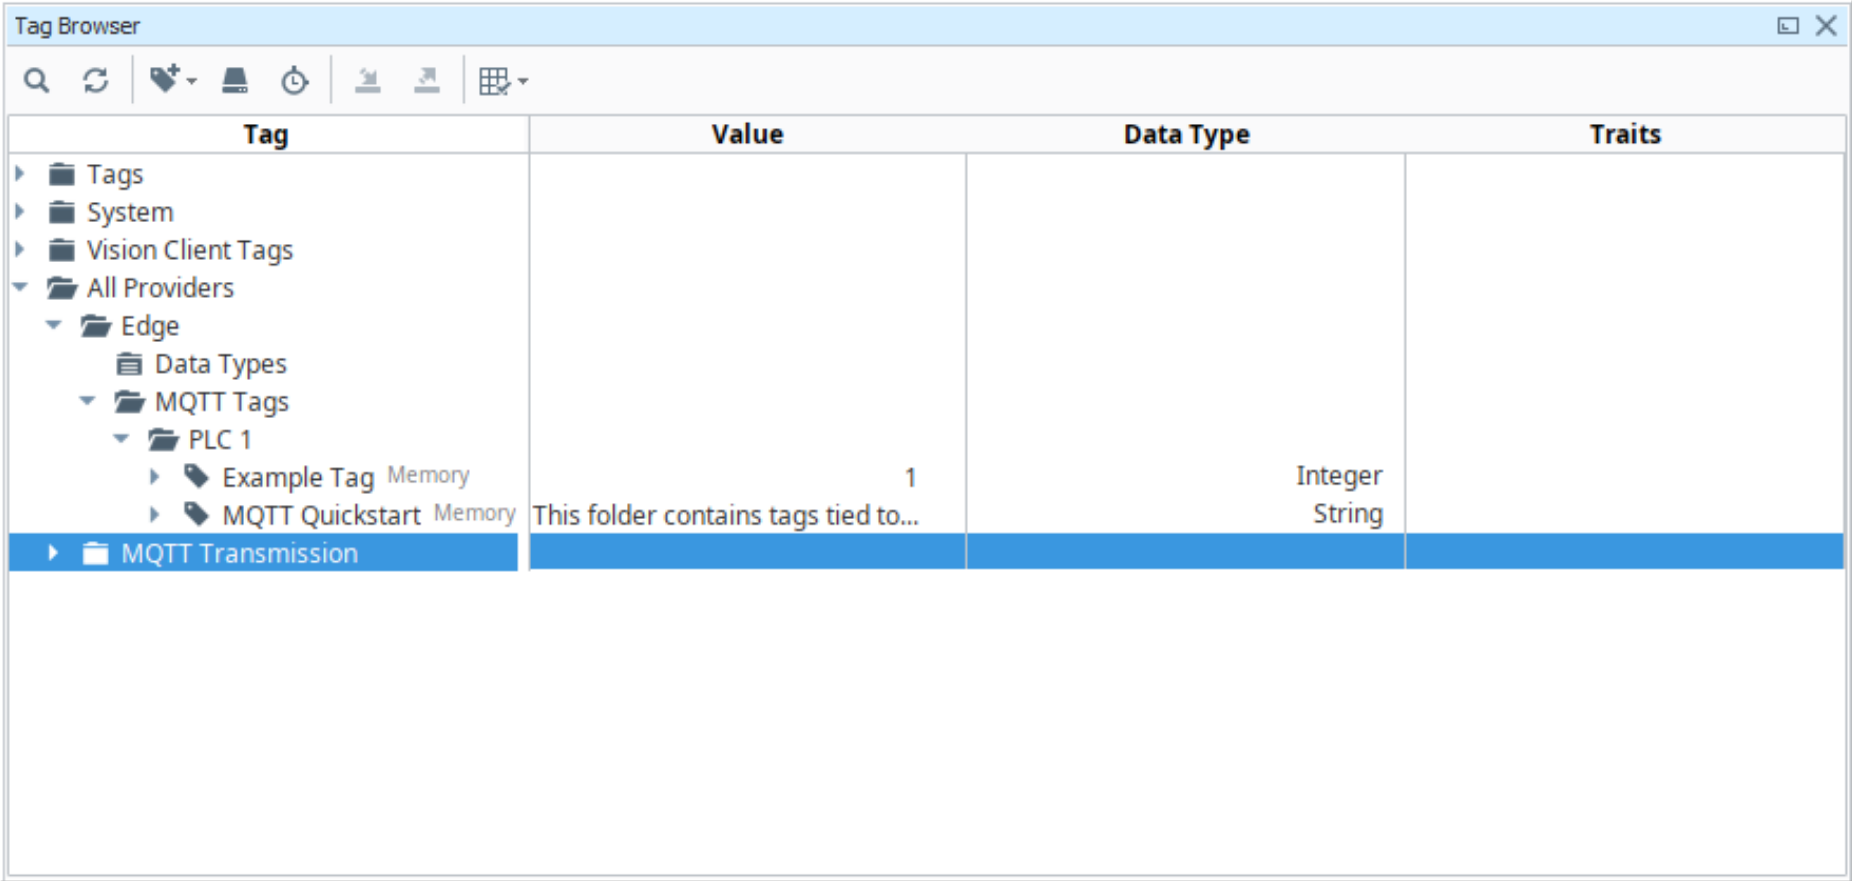
* In the **Tag Browser** pane, expand the tags in **All Providers** → **Edge** → **MQTT Tags** → **PLC 1**. You should see a set of default tags similar to the screenshot below:
#### Test Edge Tags
* Change the integer value of the **Example Tag** several times.
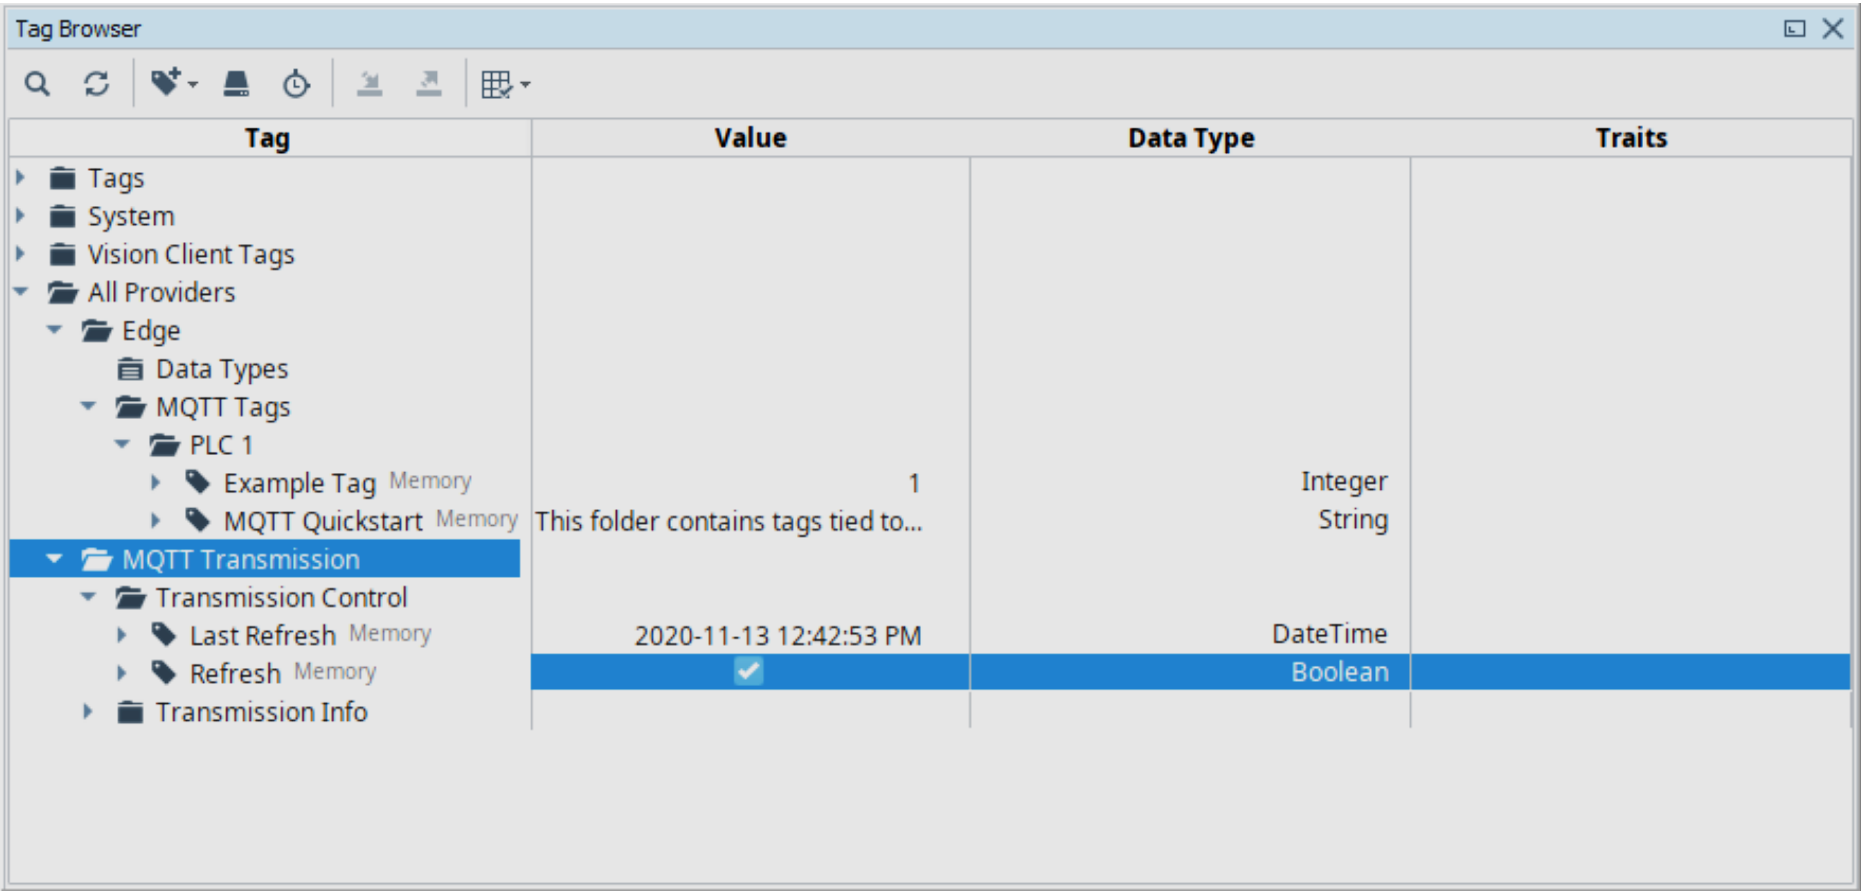
* Expand the **All Providers** → **MQTT Transmission** → **Transmission Control** tag folder so you can see the **Refresh** tag.
* Refresh the tags by setting the checkbox in the **Refresh** tag. Wait for it to go blank (unchecked) again.
### Launch Central Ignition Designer and Verify Tags
* Launch **Designer** for your **Central Ignition Gateway**.
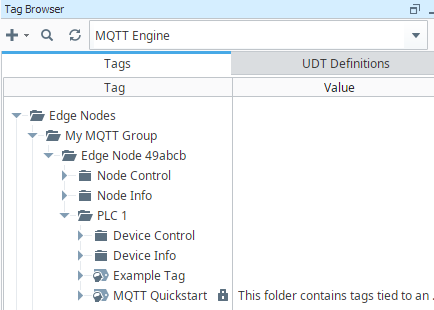
* In the **Tag Browser** pane, expand the tags in **All Providers** → **MQTT Engine** → **Edge Nodes** all the way down to the **Example Tag** in the folder previous named in the **Device ID** field in the **Sparkplug Settings** section (in this case, ***Device101***). You should see tag folders and tags similar to the screenshot below.
* You should see that the last value that was set for **Example Tag** in the Edge Gateway is now reflected here in the Central Ignition Gateway.
* Change the integer value of **Example Tag** in the Edge Designer and verify that the change propagates over to **Example Tag** in the Central Ignition Designer.
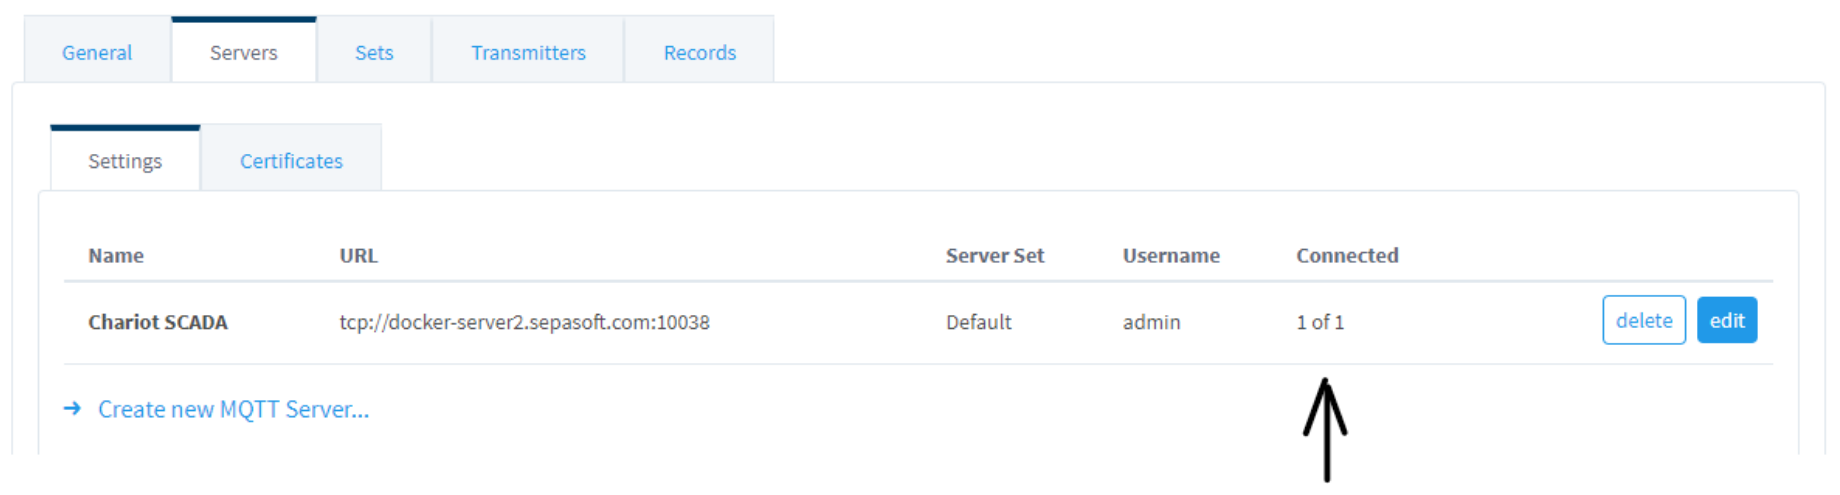
|  | If **Example Tag** in the Central Ignition Designer is not changing, verify that the connection is still valid on the Edge Gateway MQTT Transmission Settings:
 |
| --- | --- |
* * *
#### Test Using Value Editor Component
On the **Central Ignition Gateway**, you should have the **OEE Downtime Module** and the **Production Module** installed (as well as a database configured for the **Production** and **OEE Downtime** modules). Once you have verified that these modules are both running:
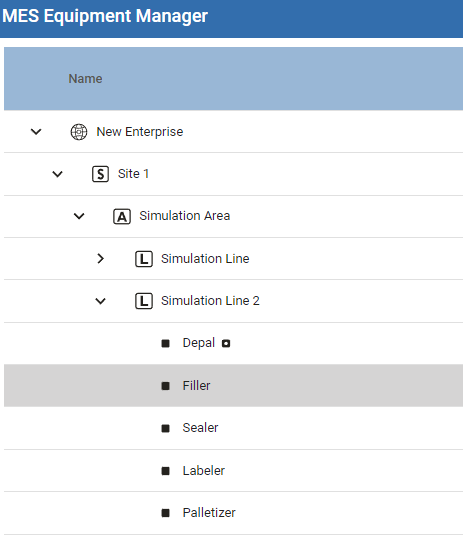
* In **Designer** for the Central Ignition Gateway, create (or open) a page with an **MES Equipment Manager** component.
* Create a Production Model. Example:
#### Configure State Tag Collector
* Verify that the Production Model is activated (not showing in red).
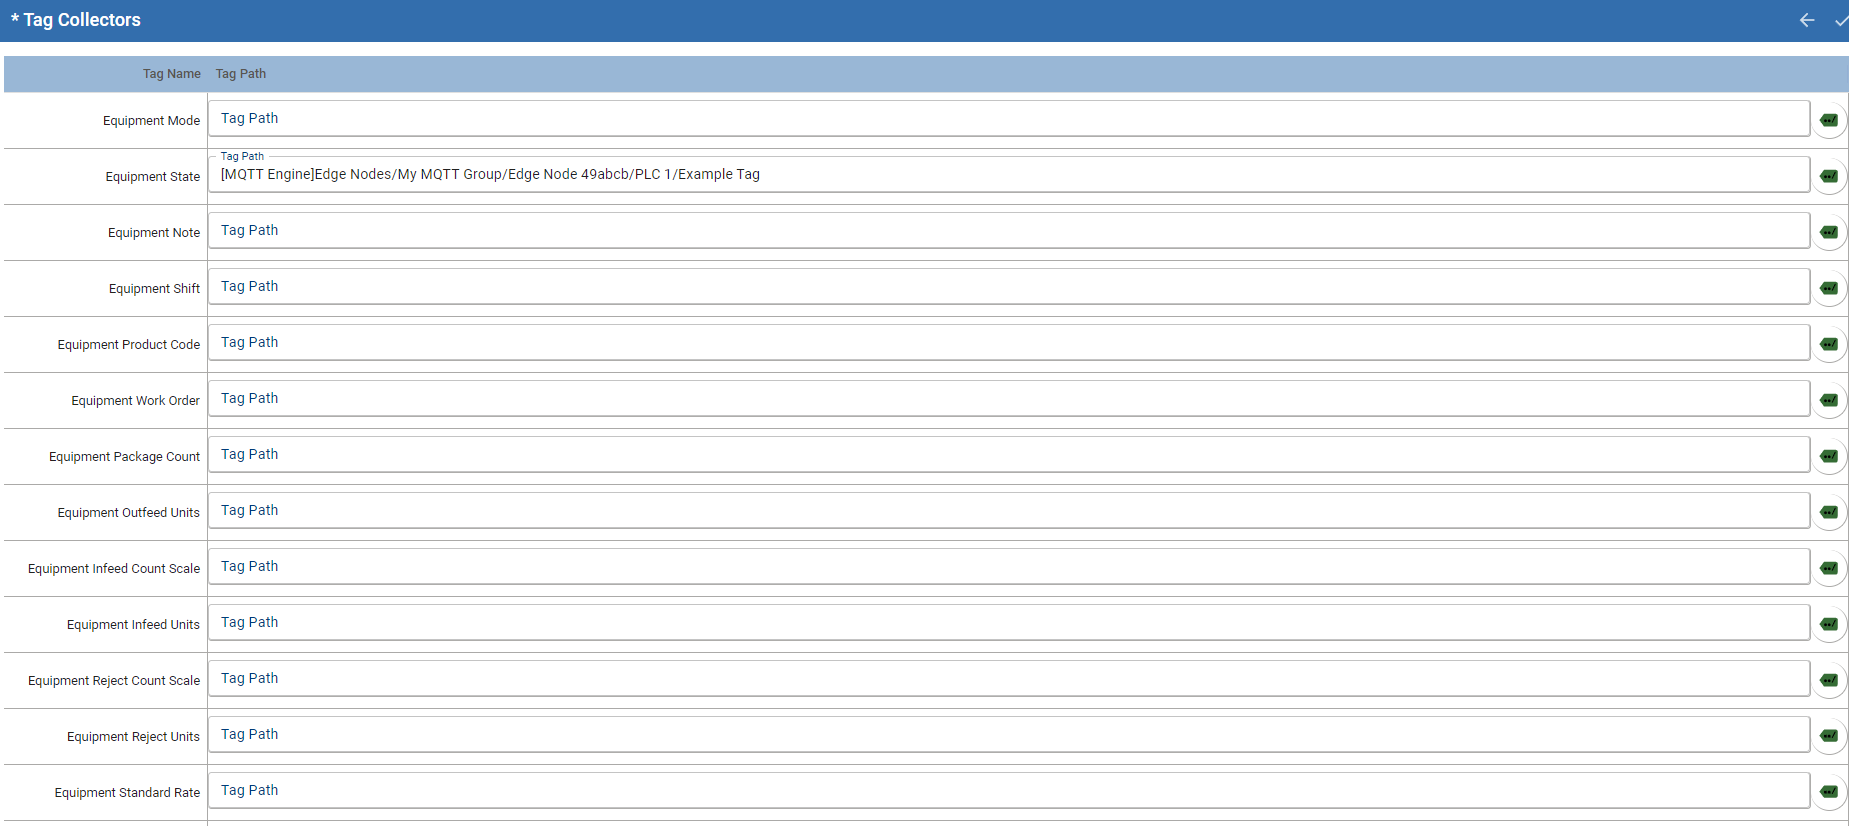
* Click on the **Line** and in the General section click on **Tag Collectors**.
* Add the tag path for the **Example Tag** created by MQTT Transmission to the **State** tag collector.
* Click **Save**.
#### Configure a Value Editor Window
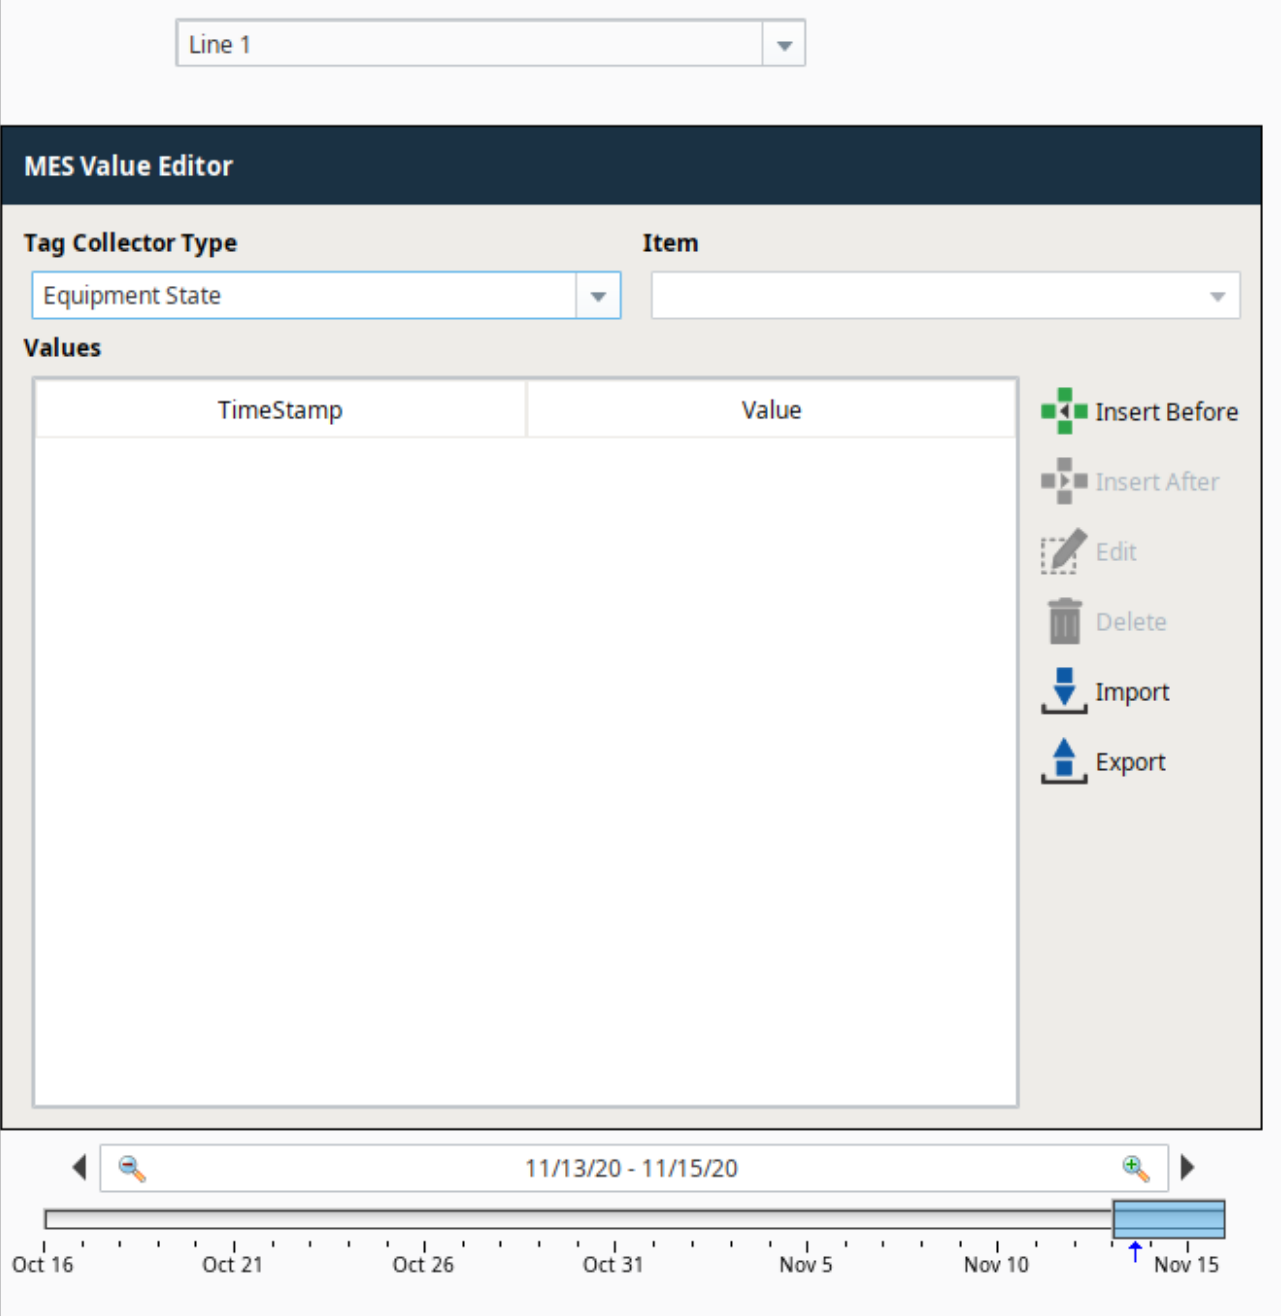
* On a new main window, drag on an **MES Object Selector**, **MES Value Editor**, and a **Date Range** component. Arrange as shown below.
* In the **MES Object Selector**, select to ***Include MES Line Objects***.

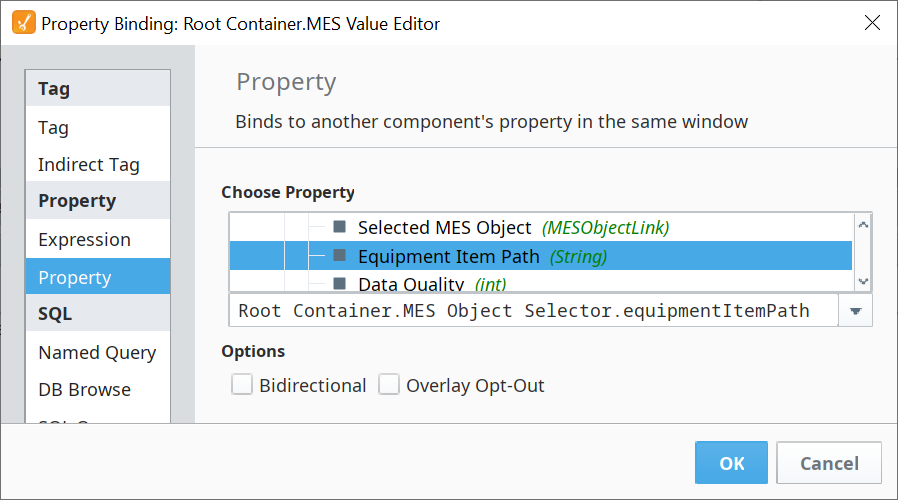
* Bind the **Equipment Path** property of the **MES Value Editor** to the **Equipment Item Path** property of the **MES Object Selector**.
* Bind the **Start Date** and **End Date** of the **MES Value Editor** to the **Start Date** and **End Date** on the **Date Range** component.
* On the **MES Object Selector**, select the line that you set to collect data from the Example Tag (***Line 1*** in this example).
* Set the **Tag Collector Type** field of the **MES Value Editor** to ***Equipment State***, and make sure that the **Date Range** component is set to sufficiently brackets the timespan when you made changes to **Example Tag**.
* In the **Tag Browser** pane of the **Edge Gateway Designer**, change the integer value of the **Example Tag**. You should see values added to the **MES Value Editor**.
**Sepasoft MES Module Suite**