Sepasoft MES Module Suite
RESTful Configuration
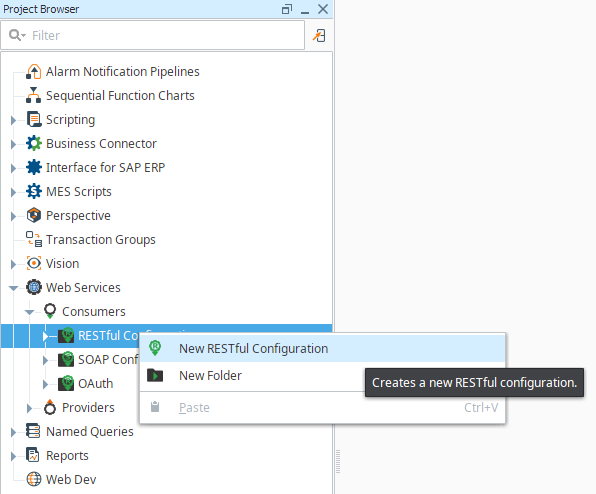
To connect to a RESTful Web Service Provider, first create a new RESTful Configuration in the Project Browser of the Ignition Designer by right-clicking on RESTful Configurations in the Web Services section and selecting New RESTful Configuration.

|
In 3.81.10 SP7 and later Web Services supports OAuth strategy selector for RESTFul configurations. This strategy encodes the Client's ID and Secret into the "Authorization" Header. The credentials are encoded specifically in this format that encodes the tokens into base-64. This strategy is specifically needed by Xero, but it is a common strategy used/accepted by a variety of OAuth providers. |
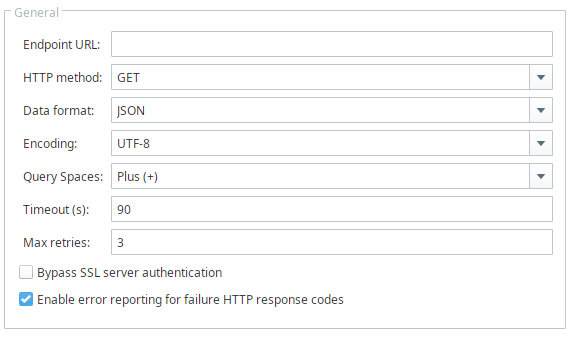
General Settings
| Name | Description |
|---|---|
URL | The target location URL for the RESTful configuration. Example: https://reqres.in/api/users |
HTTP method | HTTP requests include a method, which is a keyword explaining the action that the client wants the server to perform for the material included in the request. The available HTTP methods are GET, POST, PUT, DELETE. |
Data format | The available options are JSON and XML. |
Encoding | The available encoding types are UTF_8, UTF_16, ISO_8859_1, Windows_1252, and ASCII. |
| Query Spaces | Drop-down list that determines whether "-" or "%20" is used as the escape character(s) for typed spaces in the URL Query String. Default is "Plus (-)". |
Timeout | This is the time the module will wait until a response is received from the URL. If no response is received then an error is generated. Calls that take more than < Gateway Read Timeout Setting> seconds will time out in the Client. |
Max retries | The maximum number of retries, in case of connection failure. Default value is 3. |
Bypass SSL server authentication | The consumer (client) will bypass SSL server authentication if the checkbox is selected. |
Enable error reporting for failure HTTP response codes | An exception will be thrown when the web service call results in a code like 404 or other error codes, if the checkbox is selected. |


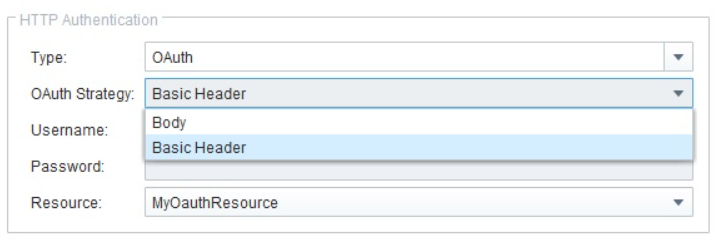
HTTP Authentication
| Name | Description |
|---|---|
Type | The options are HTTP Basic, HTTP Digest, HTTP NTLM, and Oauth. |
| OAuth Strategy | Body: The OAuth parameters are built into the body of the request payload. Basic Header: OAuth client parameters are embedded in a header in the request payload. |
Username | The user name to set for the new RESTful configuration. |
Password | The password to set for the new RESTful configuration. |
| Resource | A list of OAuth authorization grants. |
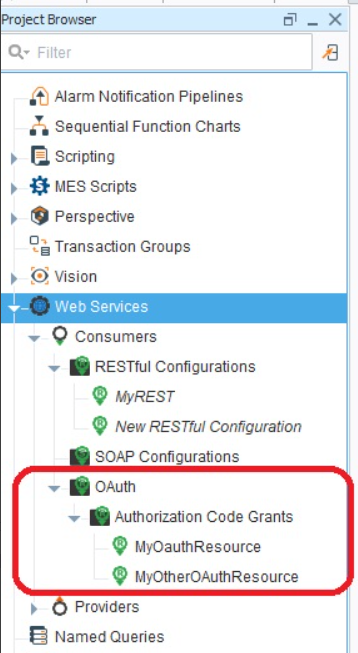
Setting Up Authorization Grants
You set these up in the Designer Project Browser under Web Services/Consumer/OAuth/Authorization Code Grants
You must set up an OAuth service before configuring authorization grants.
Request Message
| Name | Description | |||||||||||||||||||||||||||||||||||||||||||||||||||||||||||||||||||||||||||||||||||||||||||||||||||||||||
|---|---|---|---|---|---|---|---|---|---|---|---|---|---|---|---|---|---|---|---|---|---|---|---|---|---|---|---|---|---|---|---|---|---|---|---|---|---|---|---|---|---|---|---|---|---|---|---|---|---|---|---|---|---|---|---|---|---|---|---|---|---|---|---|---|---|---|---|---|---|---|---|---|---|---|---|---|---|---|---|---|---|---|---|---|---|---|---|---|---|---|---|---|---|---|---|---|---|---|---|---|---|---|---|---|---|---|
Request Header | Depending on the Web Service, these can be used to identify the format of the body object you are POSTing to the web service, or perhaps an API key or other identifying tool. A standard Request Header Item would be Content-type which can be used to indicate the format of the body object. The most common value for Content-type is application/json, but this is entirely dependent upon the web service you are posting to and the data format you are posting. Other common mime-types are...
| |||||||||||||||||||||||||||||||||||||||||||||||||||||||||||||||||||||||||||||||||||||||||||||||||||||||||
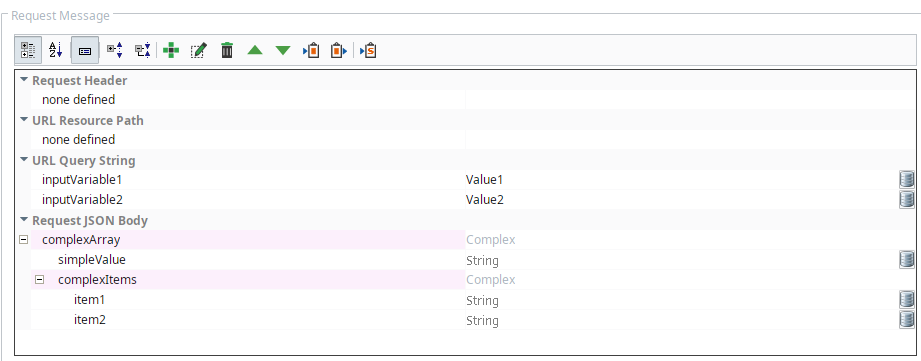
URL Resource Path | These are additional paths appended to the end of the URL, divided by slashes. For example: http://demo.sepasoft.com/main/system/webdev/WebServicesAPI/getProductCodeList?filter=SA contains "/main", "/system", "/webdev", "/WebServicesAPI" and "/getProductCodeList" as resource paths. URL Resource Path entities are created in the RESTful Configuration as shown to the right (they are appended in the order they are listed). | |||||||||||||||||||||||||||||||||||||||||||||||||||||||||||||||||||||||||||||||||||||||||||||||||||||||||
URL Query String | These follow any resource paths, and follow a question mark. They have a key and a value. Using the above example, filter=SA is a query string. They are appended to the end of the URL, after any appended URL Resource Path strings. URL Query String entities are created in the RESTful Configuration as shown to the right (they are appended in the order they are listed). | |||||||||||||||||||||||||||||||||||||||||||||||||||||||||||||||||||||||||||||||||||||||||||||||||||||||||
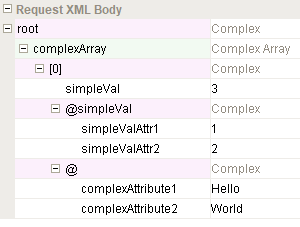
| Request Body | This section can be created to represent an XML- or JSON-format Request Body. The XML Request Body can include XML attributes, as shown in the example below.
The above example is translated into the XML representation below and sent in the POST body to the remote web server:
|
| Icon | Function | Description |
|---|---|---|
| Categorized / Alphabetic | Determines how the rows in the Request Message area are sorted. |
| Show/Hide Description Area | Toggle to show or hide the Description Area underneath the main Request Message area. |
| Expand / Collapse | When sorted as 'Categorized', then Expand and Collapse work on the rows in each of the categories. |
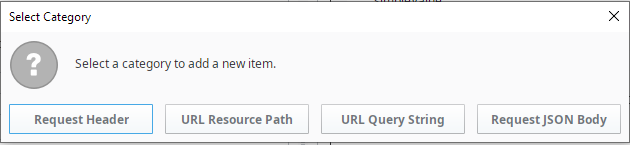
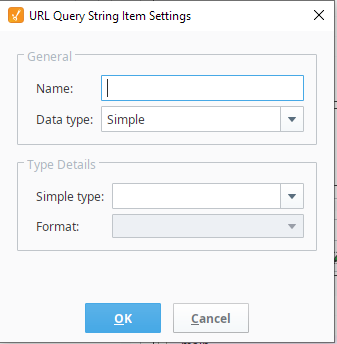
| Add New Item | When Add New Item is clicked, the following dialog box appears, to allow selecting the category of item to add.
|
| Edit Selected Item | When Edit Selected Item is clicked, a dialog box with the settings for the selected row will appear.
|
| Remove Selected Item | Removes the selected row. Note: There is no 'undo' function for this. |
| Move Selected Item One Row Up / Down | Moves the selected row in the direction of the arrow clicked. |
| Copy Selected Row | Copies the selected row to a local clipboard (not the computer clipboard). This function applies only to the complex data type. |
| Paste Copied Row | Pastes the copied row in the local clipboard into the complex parameter. This function applies only to the complex data type. |
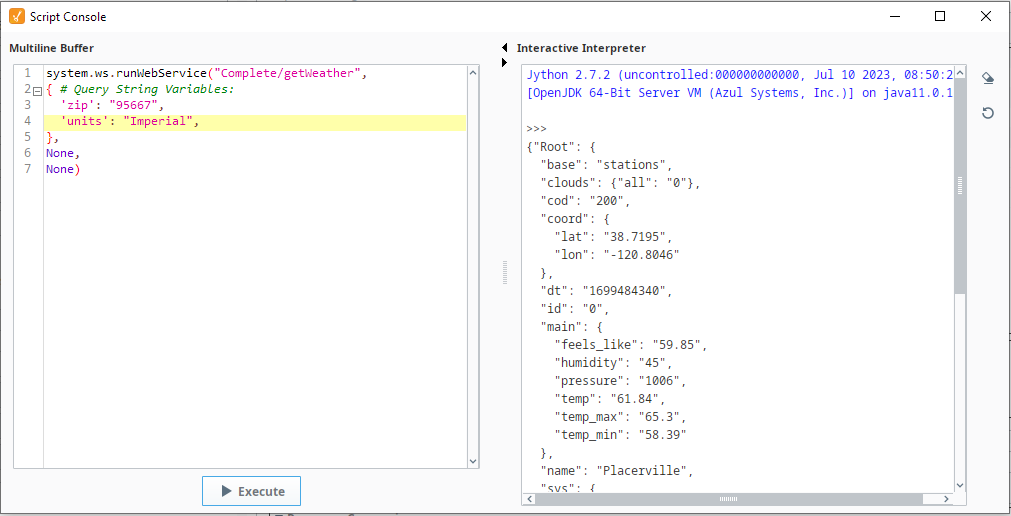
| Copy Sample Script | Copies the completed 'runWebService' scripting function required to run the RESTful Consumer to the computer clipboard (can be pasted anywhere). Here is an example copied script pasted into the Script Console and executed. Note the returned Response Message on the right.
|


Description
Underneath the Request Message area is the Description Area. Click on a row in the Request Message area and information about the parameter in that row will be displayed.
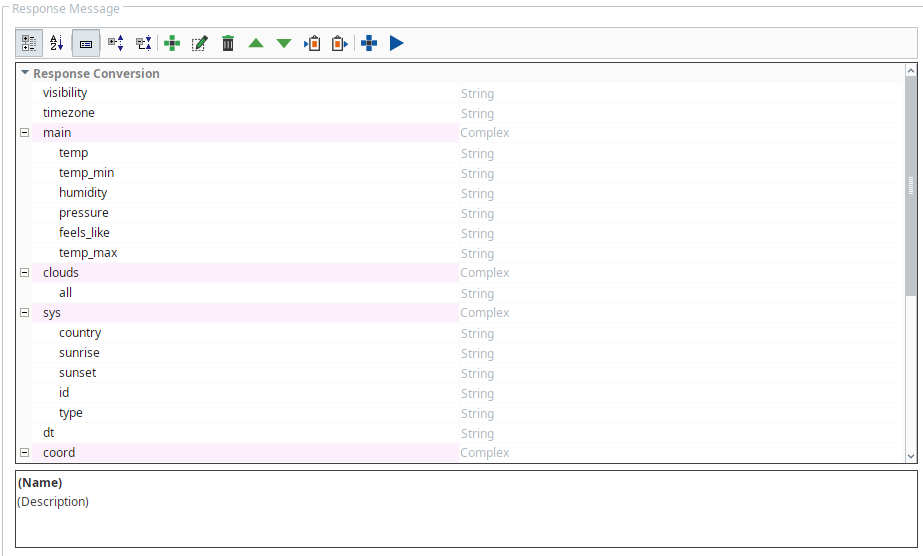
Response Message
| Icon | Function | Description | ||
|---|---|---|---|---|
| Categorized / Alphabetic | Determines how the rows in the Response Message area are sorted. | ||
| Show/Hide Description Area | Toggle to show or hide the Description Area underneath the main Response Message area. | ||
| Expand / Collapse | When sorted as 'Categorized', then Expand and Collapse work on the rows in each of the categories. | ||
| Add New Item | When Add New Item is clicked, the following dialog box appears, to allow selecting the category of item to add. This function applies only to complex and array data types. | ||
| Edit Selected Item | When Edit Selected Item is clicked, a dialog box with the settings for the selected row will appear.
| ||
| Remove Selected Item | Removes the selected row. Note: There is no 'undo' function for this. | ||
| Move Selected Item One Row Up / Down | Moves the selected row in the direction of the arrow clicked. | ||
| Copy Selected Row | Copies the selected row to a local clipboard (not the computer clipboard). This function applies only to the complex data type. | ||
| Paste Copied Row | Pastes the copied row in the local clipboard into the complex parameter. This function applies only to the complex data type. | ||
| Generate Response Body from JSON or XML | If you already have a JSON or XML Response Message from the intended RESTful Provider, click this icon and then paste it into the popup dialog area. Click OK and it will be parsed to extract the Response Conversion rows required for the RESTful Consumer. The result will populate in the Response Message area. | ||
| Run Web Services Configuration | If you do not have a JSON or XML Response Message from the intended RESTful Provider, click this icon and a live Request Message will be issued (with the provided default values appended in the URL Query String). Upon receiving the Response Message, it will be parsed to extract the Response Conversion rows and populate in the Response Message area.
|


Description
Underneath the Response Message area is the Description Area. Click on a row in the Response Conversion area and information about the parameter in that row will be displayed.
The format of the Web Service Response Message can be set using the Response Conversion Item setting. Data types such as DateTime, Float4, Float8 has format options in a drop down menu, as shown.

Sepasoft MES Module Suite