Sepasoft MES Module Suite
Configuring OAuth Client Credentials for RESTful Consumers
The RESTful Webservice Consumer now supports the OAuth 2.0 Client Credentials grant type, providing a robust, industry-standard method for authenticating server-to-server API interactions. This section provides a step-by-step technical guide for configuring this grant type. The process links two key components: a Keycloak authentication server, which issues access tokens, and the Ignition Designer, where the RESTful consumer is configured to use them. The result is a more secure, standardized, and automated authentication framework for your REST API integrations.
- Prerequisites: Setting up the Authentication Server
- Part 1: Keycloak Client Configuration
- Create a New Realm
- Create a New Client
- Configure Client Capabilities
- Retrieve Client Secret
- Part 2: Ignition Designer Configuration
- Create the OAuth Client Credentials Grant
- Configure the RESTful Consumer
- Part 3: Execution and Verification
- Running a Test Request
- Decoding the JWT Token
Prerequisites: Setting up the Authentication Server
Before configuring the client in Ignition, you must have a functioning authentication server. This server acts as the central authority for identity and access management, responsible for issuing the bearer tokens that the RESTful consumer will use for authentication. This guide uses a Keycloak instance as the reference implementation.
If you do not have an active Keycloak instance, you can launch one for development and testing purposes with the following Docker command:
docker run -p 8080:8080 -e KEYCLOAK_ADMIN=admin -e KEYCLOAK_ADMIN_PASSWORD=password quay.io/keycloak/keycloak:25.0 start-dev
With the authentication server running, you can proceed to define the client identity that Ignition will use.
Part 1: Keycloak Client Configuration
This section outlines the procedure for creating a unique client identity within Keycloak. This client registration establishes a trusted relationship between your RESTful consumer and the authentication server. The outcome of these steps is a set of credentials (a Client ID and a Client Secret) that the consumer will present to Keycloak to request access tokens on its own behalf.
Create a New Realm
A realm in Keycloak is a dedicated management space for clients and roles. You will create a new realm to isolate this configuration.
Log in to the Keycloak administration console.
In the top-left corner, hover over the current realm name (e.g., "Keycloak") to reveal the Create realm button, and click it.
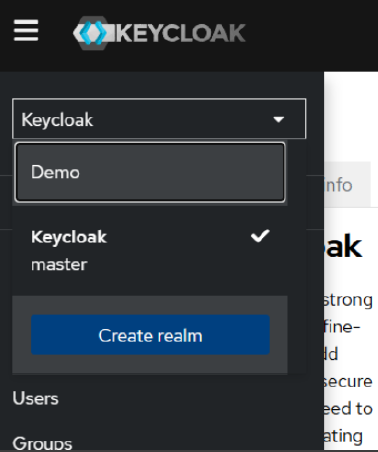
Provide a name for the new realm. This guide uses Demo.
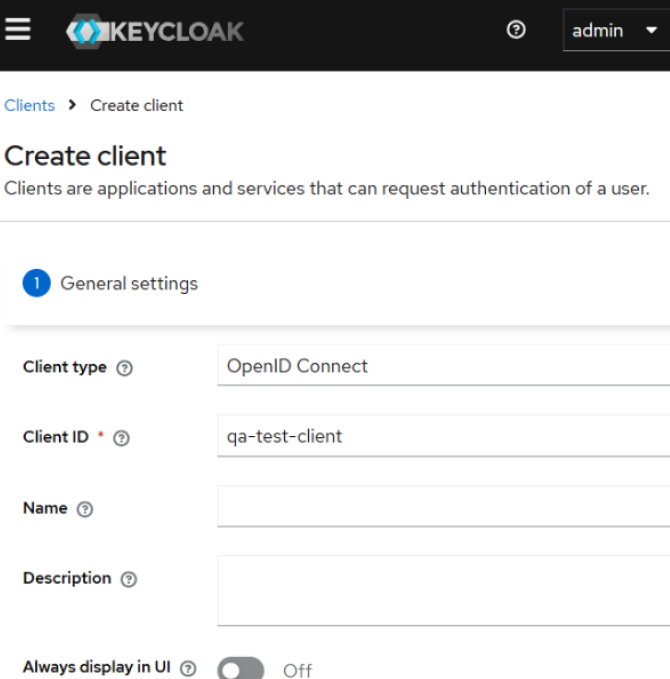
Create a New Client
Within the Demo realm, you will register the RESTful consumer as a new client.
Navigate to the Clients menu.
Click Create client.
Define the initial client settings:
Client type: OpenID Connect
Client ID: qa-test-client
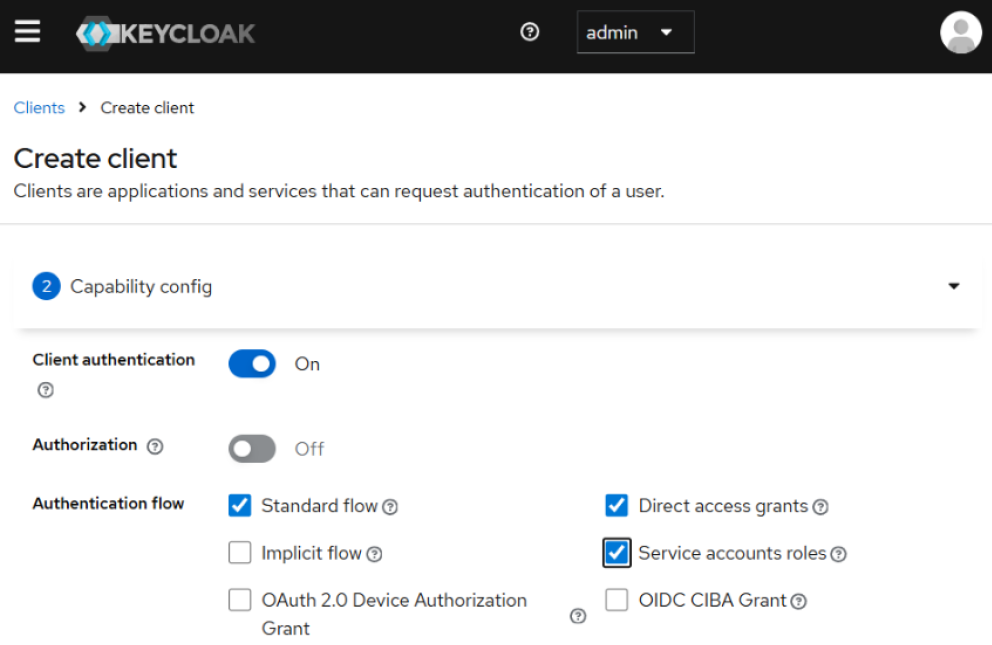
Configure Client Capabilities
After creating the client, you must enable the specific capabilities required for the Client Credentials flow.
In the client settings, configure the following capabilities:
Set Client authentication to On.
Under Authentication flow, ensure both Standard flow and Direct access grants are enabled.
Enable Service accounts roles. This is the core requirement that permits the client to request tokens for itself in a machine-to-machine flow where no user is present.
Click Save to apply the configuration.
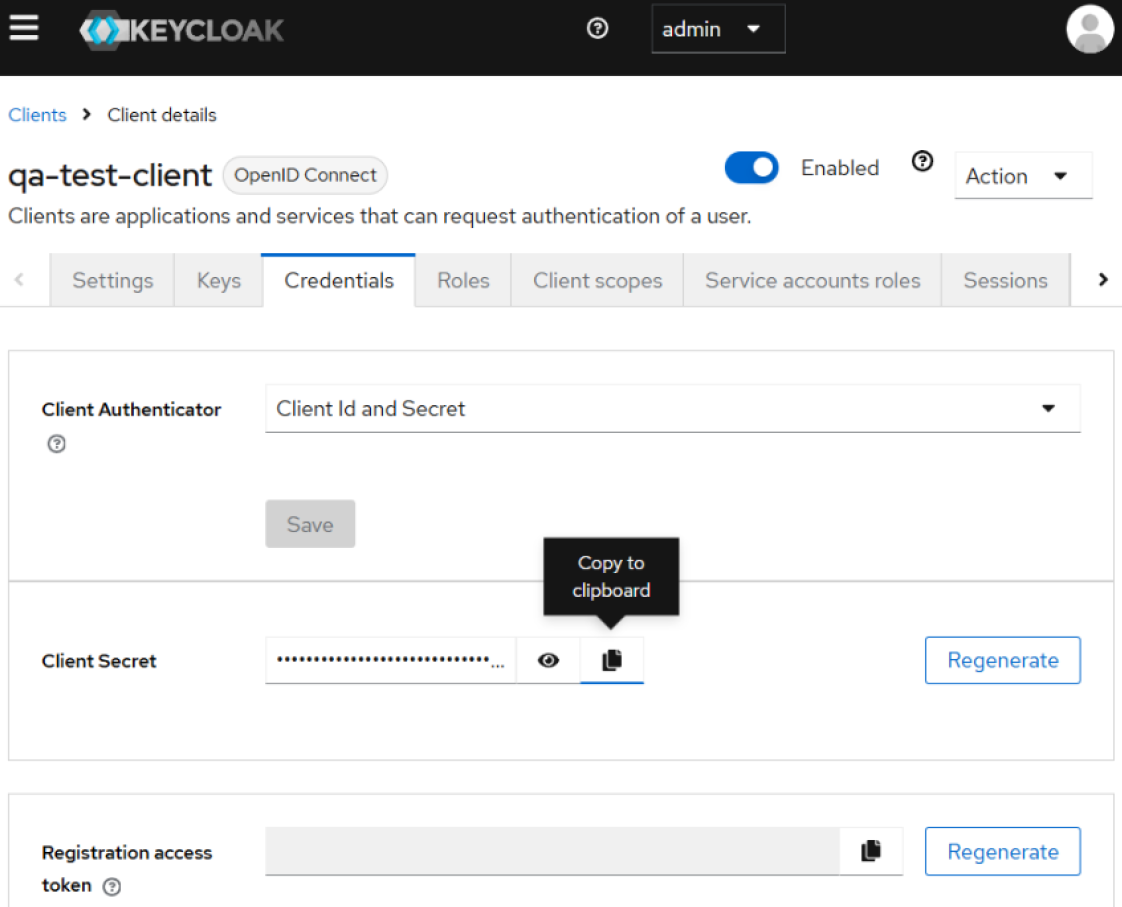
Retrieve Client Secret
The final step in Keycloak is to obtain the confidential secret that, along with the Client ID, authenticates your client.
Navigate to the Credentials tab for the qa-test-client.
Copy the Client Secret value displayed on this tab.
With the Client ID and Client Secret secured, you have all the necessary information from the authentication server to proceed with the configuration in the Ignition Designer.
Part 2: Ignition Designer Configuration
This section details how to use the credentials generated in Keycloak to configure the RESTful consumer in Ignition. The technical objective is to create a durable link between the consumer and the authentication server, enabling automated token acquisition and management.
Create the OAuth Client Credentials Grant
First, create a new configuration object in Ignition to securely store the client credentials and the token endpoint URL.
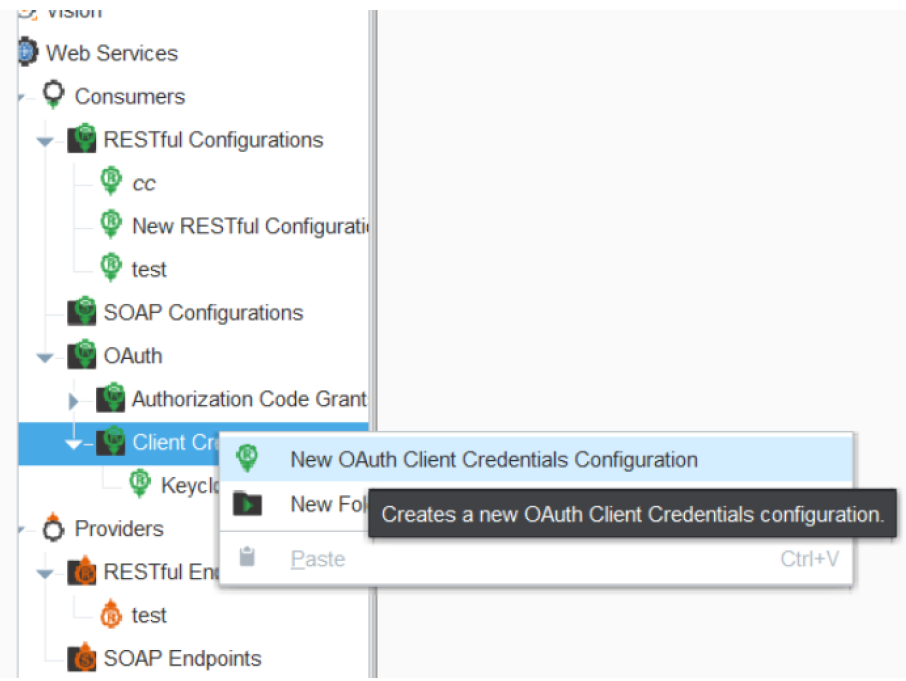
In the Ignition Designer Project Browser, navigate to Web Services > Consumers > OAuth.
Right-click on the Client Credentials Grants folder and select New OAuth Client Credentials Configuration.
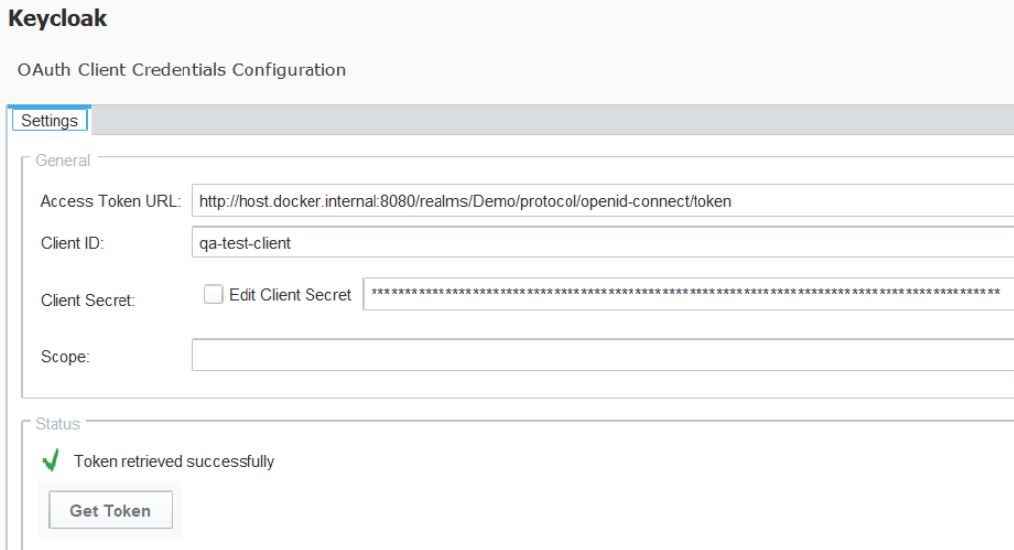
Complete the configuration fields as defined in the table:
Field Name | Description |
Access Token URL | The URL of the authentication server endpoint where the bearer token is obtained. For this example Keycloak instance, the URL is http://host.docker.internal:8080/realms/Demo/protocol/openid-connect/token. |
Client ID | The unique identifier for the client, as configured in Keycloak (qa-test-client). |
Client Secret | The confidential string for the client that you copied from the Keycloak Credentials tab. |
Scope | A space-delimited list of permissions the client is requesting. The specific values are defined by the resource server (the target API). Can be left blank if not required by the API. |

|
Note: The realm name in the Access Token URL (Demo) is case-sensitive and must match the realm created in Keycloak exactly. |

|
Important: The hostname host.docker.internal is used specifically when Ignition and the Keycloak Docker container are running on the same host machine. In a production or distributed environment, replace host.docker.internal with the correct IP address or fully qualified domain name of your authentication server. |
- After entering the details, click the Get Token button to validate the configuration. A "Token retrieved successfully" message confirms that Ignition can communicate with Keycloak and acquire a token.
Configure the RESTful Consumer
The final step is to link your REST service call to the OAuth grant you just created.
Open the configuration window for your RESTful Webservice Consumer.
Apply the following HTTP Authentication settings:
HTTP Authentication: OAuth
OAuth Grant Type: Client Credentials
Resource: Select the OAuth Client Credentials configuration created in the previous step.
At this point, the consumer is fully configured. It will now automatically handle the process of requesting a bearer token and attaching it to every outbound API call.
--------------------------------------------------------------------------------
Part 3: Execution and Verification
This final section validates the end-to-end configuration. The technical objective is to confirm that the RESTful consumer can successfully acquire an access token from Keycloak and use it to authenticate an API request, proving the entire workflow is operating correctly.
Running a Test Request
Execute the configured web service call to trigger the full authentication and request sequence.
In the Ignition Designer, open the Script Console.
Execute the web service call by name: system.net.runWebService("ClientCredTest")
A successful execution returns a response object. This object contains a headers dictionary; within it, you will find the Authorization key with the bearer token as its value. This confirms that the consumer automatically performed the token acquisition from the configured Access Token URL and attached it to the outbound HTTP request. The header will be formatted as: Authorization: Bearer ...
Copy the entire token string that follows "Bearer ".
Decoding the JWT Token
To complete the verification, inspect the contents of the JSON Web Token (JWT) to confirm it was issued to the correct client.
Use a JWT decoder tool, such as the online debugger at https://www.jwt.io/.
Paste the copied token into the "Encoded" input field.
Examine the decoded payload data.
Verify that the azp or clientId field in the payload matches the Client ID you configured in Keycloak (e.g., qa-test-client).
A matching client ID in the decoded token payload provides definitive proof that the entire OAuth Client Credentials authentication flow is correctly configured and fully operational.
Sepasoft MES Module Suite