Sepasoft MES Module Suite
Recipe Editor in Vision
The Recipe Editor component provides a visual and interactive method to manage recipes.
Enables you to:
- Manage recipe value security.
- Manage sub product code recipes.
- Manage default machine values.
- Manage master recipes.
- Manage machines that a recipe can be run.

|
There are multiple methods that can be used to change the values of a recipe. Depending on the functionality that you are looking for, recipe values can be changed using the recipe editor, imported or by scripting. Refer to Recipe Scripting for more information on creating recipes through scripting. |
Adding a Machine Recipe
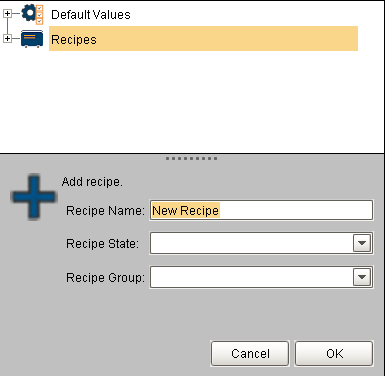
To add a new recipe, right click the recipe > Add Recipe menu item.

|
Commonly, the name of the recipe will be the same as a product code, but it does not have to be. It can represent a mode of the machine such as Cleaning Mode. |
Characters Not Allowed in Names
These characters are reserved by the Sepasoft modules.
Production Equipment
. ? ! # % ^ * ~ [ ] { } + = ` \ @ & ( ) < >,
MES Person
. ? ! # % ^ * ~ [ ] { } + = ` \/ " $ | < >
Other MES Objects
. ? ! # % ^ * ~ [ ] { } + = ` \/ " $ | ,
Machine Recipe Name in Settings & Changeover Module
Follows the same convention as Other MES Objects
Exception: Full-stop period . is allowed as of 3.81.10 SP2
Batch Names in Batch Procedure Module
. ? ! # % ^ * ~ [ ] { } + = ` \/ " $ | ,
Recipe State
It is possible to add State categories to a recipe. Examples of states could be PRODUCTION, QUAL, TESTING, IN_DEV. You can create any custom State. As you create State categories by typing in a name in the Recipe State field, that State becomes available for other recipes.
The State can be used as a filter by certain recipe components and also in scripting to limit which recipes are displayed or can be selected.
Recipe Group
Examples of Groups could be PACKAGING, PROCESSING, XX_45, etc., You can create any custom Group. As you create Group categories by typing in a name in the Recipe Group field, that Group becomes available for other recipes.
The Group can be used as a filter by certain recipe components and also in scripting to limit which recipes are displayed or can be selected.
Associating a Recipe to Production Items
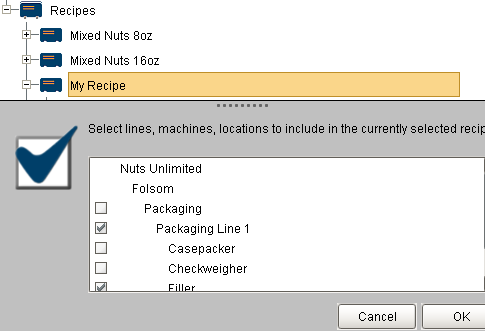
Next, right-click on the new recipe and choose the Select Production Items menu item.

|
You must first add production items in Ignition Designer before they appear as options to be added to a menu. Because not all machinery is used in every recipe, this step is used so that only the machinery that is appropriate for a recipe appears in the recipe editor and recipe selector components. For this example, Line 1 and all of the cells (machines) beneath it are associated to the recipe. |
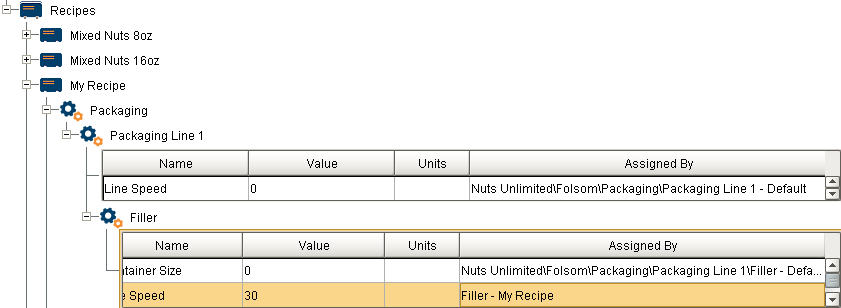
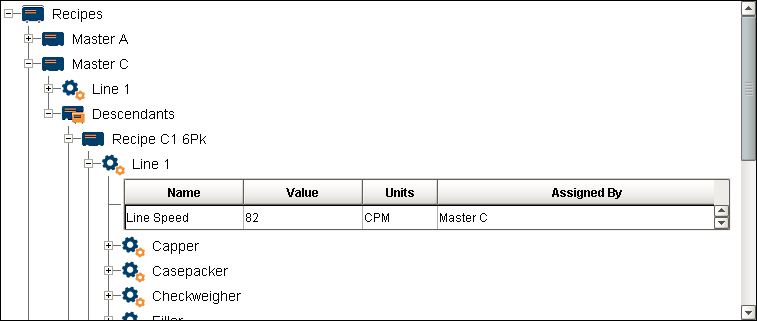
After clicking the OK button, expand the production item to view and edit the recipe values. Notice the Assigned By column. When the new recipe was first added, all of the recipe values show as assigned by the equipment path for the production item. This is because the initial values of a new recipe are inherited from the default values for the production item. When a recipe value is changed, the Assigned By changes to My Recipe. This is because the value no longer comes from the default values and is now from the recipe. In simpler terms, it tells you where the value has been changed in the inheritance tree.
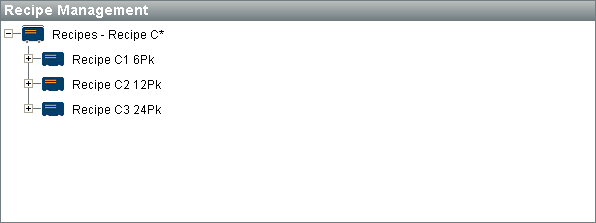
My Recipe appears in the Recipe Selector List component and can be selected for any of the production items that were added to the recipe. But My Recipe can also be made into a master recipe simply by adding descendant recipes to it. This is done by right clicking on the Descendants item beneath the My Recipe recipe in the recipe editor, and clicking on the Add Recipe menu item.
There is no limit to the number of descendants recipes you can add to a master recipe. There is also no limit to the number of levels deep of master recipes. After My Recipe 1 is added to My Recipe, My Recipe will no longer show as an option in the recipe selection list component but My Recipe 1 will. In general, if a recipe has descendants, it becomes a master recipe and will no longer show in the recipe selection list component. Only final recipes with no descendant will show in the recipe selection list component. However, master recipes can be selected for production items by using script functions.
Adding Notes
Whenever a recipe value is changed, you can require the person making the change to add a note. The note entered will then be recorded along with the change and available through the Recipe Change Log.
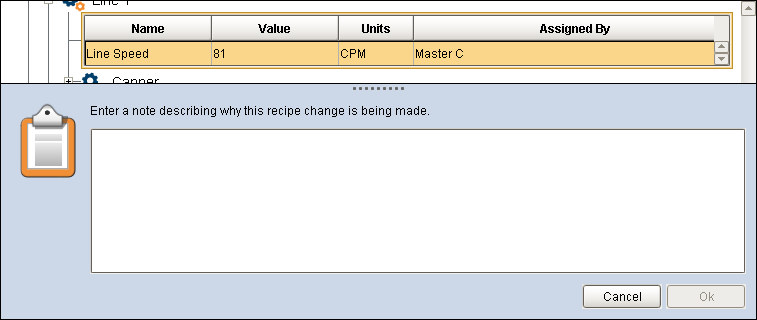
To enable this feature, set the Require Note property to true on the Recipe Editor component.
Filtering Recipes
The Recipe Editor component provides a number of properties that allow for the filtering of recipes that will be shown in the Recipe Editor. These filters can be used to limit who has access to view which recipes or for reducing the number of recipes shown. Available filters are...
- Item Path Filter
- Recipe Name Filter
- Recipe Value Name Filter
- Recipe State Filter
- Recipe Group Filter
Based on the property settings of the Recipe Editor component, more or less detail can be shown. This provides a method of displaying the correct amount of information depending on the logged in user's authentication roles. This mode allows changing of recipe values for final recipes (not in master recipes).
By enabling all Show properties, a lot more recipe information with many more options provides far more recipe configuration properties. The Show Master Recipes property will determine if master recipes are shown.
New master recipes can be added by right-clicking on the root Recipes node and selecting the Add Recipe menu item. New descendant recipes can be added by right clicking on the Descendants node and selecting the Add Recipe menu item. Existing descendant recipes can be renamed, removed or etc. by right clicking on the descendant recipe node and selecting the desired menu item.
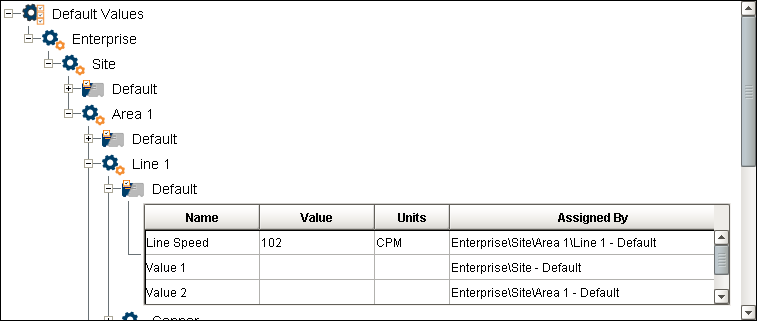
In addition to editing recipes, default values for machines (lines, cells, cell groups and locations) can be managed. The Show Item Defaults property determines if the default values root item is shown in the recipe editor.
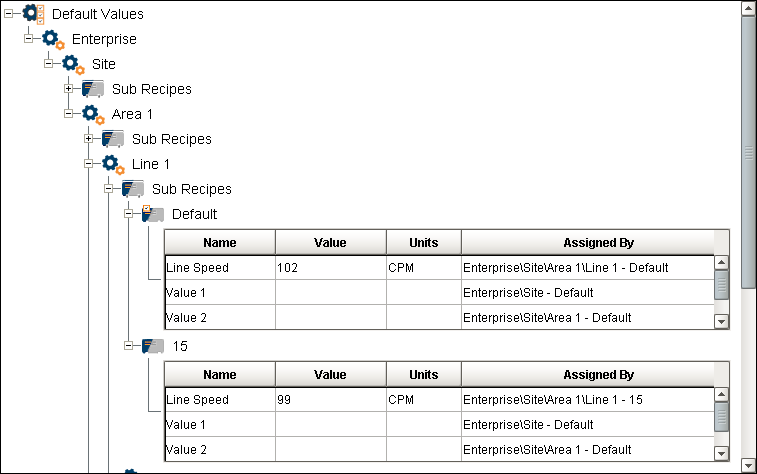
Sub recipes can also be managed by setting both the Show Item Defaults and Show Sub Recipes properties to true. See Sub Recipes for more information. New sub recipes can be added by right clicking on the Sub Recipes node and selecting Add Sub Recipe menu item. Sub recipes can also be removed, renamed or etc. by right clicking on the node of a sub recipe and selecting the desired menu item. The Default sub recipe is always shown and cannot be renamed or deleted. It is reserved for holding the default values for a machine.
Sepasoft MES Module Suite